After a summer-long hiatus from the piano, I returned to lessons with the intent to play Coldplay’s Lovers In Japan, but based on my teacher’s recommendations, settled for Lost! instead. Having never been through music lessons as a child, I never knew the fear associated with a piano recital, and it didn’t take me long to freeze up in front of a bunch of parents and little kids while playing the Beatles’ Ob-La-Di at my first recital and vow to play much better at my next recital. Three weeks of learning and practicing Lost! paid off at the Christmas recital when I played smoothly through the song despite my paralyzing fear. As proof that I actually learned to play the piano, I recorded myself earlier today!
I suppose you are wondering if I will follow up with more resolutions after last year’s successes. I have thought about new things to accomplish, but the only unique idea I have had is to learn to wrestle alligators! So instead of doing silly things just for the sake of doing something new, I’m going to keep working on these existing goals. I have been having a great time learning piano, so I plan to continue lessons and learning new songs in the year to come. My van is working great and I expect that I will continue to restore it to better-than-new condition. Last September, I got certified as an American Canoe Association (governing board of kayaking) instructor, so next year I will be sharing my knowledge and passion for kayaking as I instruct others through the Colorado Whitewater association. And lastly, I will take a photo from my helium filled balloon!
Labor Day weekend in Gunny Gorge. What could be better? I’ll tell you what, not a whole lot.
I have to thank Scott for conceiving of and organizing this really cool self-support, overnight kayak trip through Gunny Gorge. In addition to those responsibilities, he also carried all of the group gear and food in his monstrous, 12’ long Dagger Crossover so that we could have a luxurious time in camp!
Although I had done this run about 4 years ago, my only memories were of rain, cold water, shivering, and not being able to wait to get the trip over with. This year’s trip was in stark contrast to that, with beautiful, warm weather spread out over two days, stunning scenery, and lots of playful whitewater. Spending a night on the river slowed down the pace of the trip so that we could soak it all in at a pace that was truly fitting for Labor Day! After such a great experience, I would have to rate Gunny Gorge as one of my all-time river running favorites that I’m sure to do time and time again!
If you want to know if you enjoy where you live and can really call it home, spend 17 days and 4500 miles driving across the country and back. If, like me, you are utterly relieved and simultaneously overly joyful when you cross your state line again, then chances are that you like where you live and can call it home!
Take a look at the circuitous route I took across the country to the Ottawa, down through the Northeast, and finally back westward to Colorado! If you click on the map, it will take you to the full, interactive Google map with all the places I stopped along the way.
I specifically chose a different route home so I could see the Gateway Arch in person. A PBS documentary piqued my interest a few years ago, and I told myself that I would make a priority to see it the next time an opportunity presented itself. My evening arrival in St Louis presented the scene with great light, which I used to my advantage as I photographed bunches of perspective shots of this unique American monument that are posted in this photo album. I highly recommend a stop at the arch the next time you are in the neighborhood and be sure to ride the tram/elevator to the top!
One of the best aspects of my trip to the Ottawa River in my van was that it afforded me the opportunity to pop on down to the Jersey Shore afterwards to hang out with my family. After a too-quick Saturday night stop in New York to see Mom and Dad, I made it to Cape May, NJ for one of the annual Brown-Foertsch family vacations that I have never been able to attend. And this was a particularly good year to be in attendance, since it gave me a chance to meet the newest members of our family, Isabelle and Andrew!
It was a wonderful, relaxing week on the shore that was spent hanging out with brothers, sisters, in-laws, nieces, and nephews. I captured a few fun photos of our time on the beach, body surfing, and the dog-cousins playing. I have some great memories of our time there and can’t wait to see everyone again at Christmas!
The weather was cold and the nights were long back in late December when I decided to attend EJ’s kayaking class on the Ottawa River. My decision morphed with other goals and New Year’s resolutions to the end result of having kayaked 50 days (including the Numbers), having bombproofed my roll, and having radically modified my Westfalia by the time I completed the long drive to the Ottawa in late July. You could almost say that the very act of choosing and committing myself to this challenging class was the watershed moment that had the greatest impact on my kayaking. But as I like to say, it is one thing to talk about something and another to commit yourself and actually follow through.
Three other students (Olly, Neval, and Scott) and I were paired with the king of kayaking, EJ, and the prince, his son, Dane for five intensive days of instruction and playing on the river and an equal amount of goofing off and story telling off the river. When the week was over, we were all sad to part our separate ways, but our bodies were grateful for the respite.
The Ottawa is a very interesting river that is in great contrast to the rocky mountain rivers of Colorado that I am so used to. It is located in a very flat section of Canada a few hours north of Toronto and drains an extremely large area that corresponds to an equally large flow. For all intense purposes there should not be any rapids, but several geologic faults in the underlying granite bedrock cause large step changes in the river profile that results in the ultimate pool-drop rapid situation with big water! The whitewater sections of the river are dispersed over several miles with large lakes (pools) between each of the main rapids (drops). And within the stretch of water, the river splits into two primary channels- the Main Channel and the Middle Channel.
We spent every day except Wednesday on the Middle Channel, since it had a larger number of features in which to play and practice our skills. The gauge height of the river was 6’ on Monday and was certainly much bigger flow than anything I had was used to boating. It just so happened that our class occurred on the perfect week, since the previous month of rainy weather resulted in uncharacteristically high flows for that time of summer but with the added benefit of sunny weather. The flow was not only high on Monday at 6’, but it actually doubled in gauge height while we were there!
Both channels began with the first drop down McCoy’s rapid. Sattler’s Hole blocked the left portion of the river and just down stream, Phil’s Hole blocked the right portion. Fortunately, there is a multitude of ways to navigate these large obstructions, many of which involved finding a small seam right through the gut of the holes or just plain going into the holes and getting spit out eventually. Each day, EJ had us run a different line, so by the end of the week, we had learned to make it through the rapid no matter the situation. Personally, I had a few issues with the holes, since my skirt imploded on not one, but two occasions while getting window-shaded in them! The first time, I eventually exited my boat after about 5 rolls with a boat full of water, so when it happened again, I committed myself to paddling through the remainder of the rapid with just head, shoulders, and paddle above the water!
The next major feature that we encountered on the Middle Channel was the scenic Little Trickle, which was comfortingly reminiscent of Colorado boating. Once again, we ran many different lines down the rapid, each of which I thoroughly enjoyed, but with the boof move at high water being my favorite. Following that were two smooth, fun surf waves- Angel’s Kiss and Butterfly, which served up great playboating opportunities at every water level.
And then came Garvin’s Chute- a 15’ river wide waterfall with several navigable routes and many places that you don’t ever want to find yourself. Approaching it always got my heart racing as primal fear overtook my body. On Monday, the scout left me initially awestruck at the power and beauty of Dragon’s Tongue that coursed right down the center of the drop. But after watching Neval heroically run it without incident, I vowed that I would perform the feat the next day. And that I did! Despite the fear that cloaked my whole person, I followed Dane right down the smooth tongue while focusing on my target at the end of the tongue and not the side drop offs into living hell. I dropped off the bottom, experienced a surprisingly hard impact in the white, aerated water, and emerged a second later unscathed and easily able to make the move to avoid the huge hole that remained below. Phew! I definitely earned my lunch on Tuesday!
But then came Thursday with flows at the 12’ level and the option to run Elevator Shaft on the far right side of Garvin’s. Dammit! If I thought Dragon’s Tongue was intimidating, Elevator Shaft was at an entirely different level. The water plunged 10’ straight down onto the rocks below, which we were assured would not present a problem. That is, as long as we went over it right-side up. Because God only knows what would happen if you decided to have your face cushion your boat’s landing instead of the other way around. And one more thing. There was a reactionary wave just above the actual drop that wants to flip you, but that is not particularly challenging for a solid Class III boater. EJ summed it up appropriately, “Only run this if you are absolutely, 100% positive that you won’t get flipped by the wave.” So there I stood again on the precipice of Garvin’s Chute with that wave of fear descending on me. But I decided to keep a pact with myself that I would throw myself into every challenge that was presented to me during the class as long as it was within my ability. And when I looked at the moves that I needed to make, I had absolutely no doubt that I would be fine. And as fate had it, I went smoothly over the wave, down the drop, and earned my lunch once again. However, the next day one of the students in the Keener program did not stay upright but fortunately managed to make it out of there only banged up and limping. Yikes!
After Garvin’s came the two most poorly named rapids on the river, Upper NoName and Lower NoName. Upper NoName presented a fantastic, clean surf wave while Lower NoName featured big-water rapids with numerous waves and holes scattered throughout. The higher flows on Thursday and Friday changed Lower NoName’s character from a fun, semi-mellow descent to a rockin’, rowdy trip over big waves and around (or through) big holes. On the appropriately dubbed Big-Water-Thursday, attempting to surf a difficult to catch wave at the bottom of Lower NoName was on the menu. The trick to catching this wave was to “surf across Vampire hole” in order to ferry over to the wave. Well, it was technically within my means, so I had to do it, right? After not using Vampire Hole to my advantage the first time and missing the wave, I decided to throw my self smack-dab into the hole and then simply ferry across. Of course, we all know that good stories come from things never being as simple as they seem or as easy as EJ makes them look, which ultimately ends up with some quality carnage. I definitely caught Vampire Hole the next time and got a super rockin’, powerful surf for much longer than I had hoped for! It then spit me out and over into a deceptive little hole that was hiding completely out of sight in the center of the river upstream of the nice surf wave. Vampire has a deservingly mean name, but that nameless hole put more of a beat-down on me than its Transylvanian neighbor. I was window-shaded, or as EJ calls it, “power-flipped” for what seemed like an eternity and which included a shocking, kerthunk of my helmet on the rocks below in this supposedly rockless river. Thankfully, it released me and no swimming was involved. I then proceeded to rest my tired body on the shore for a few minutes before getting back on the horse by hiking back up and running Lower NoName again. When all was said and done, a new hole had been named on the Ottawa- Pat’s Hole.
You would think that was it for play features and beat-downs on the Middle Channel, but you would be wrong. There was minor feature named Warm Apple Pie just around the corner from the take out. So on Big-Water-Thursday, we decided to check it out. As we approached, EJ described it as a “super-retentive hole, but you can always make it out the sides.” Dane and EJ proceeded to throw ends, blast, mystery-move, and generally make it look like good fun. So at his invitation and in keeping with my pact, I decided to hop right in there. It turns out that when EJ describes something as “super-retentive”, it is no joke. I got flipped in the pour-over, rolled up completely disoriented, only to get sucked back in and flipped again in what seemed like an infinite loop. Well eventually, at the first opportunity when I had my wits about me, I heeded EJ’s advice, paddled like hell to the corner of the hole and made it out of there in one piece. Wow! What a day Big-Water-Thursday was for me- skirt implosion in Phil’s Hole and no swimming, then running Elevator Shaft, then getting trashed in Pat’s Hole, and finally getting spanked in Warm Apple Pie! Oh, and did I happen to mention that I did all that in a playboat that I had never paddled before? :-) When people ask me what I came away with from the class, I now say that I went to see the Wizard and I was given Courage!
But wait there’s more! I can’t neglect to mention the Main Channel that we ran on Wednesday at 11.25’. Compared to the number of features on the Middle Channel, the Main was sparser but also that much bigger. With names like Bus Eater, Waikiki, and Coliseum, you can instantly recognize that the Main is not for the faint of heart. Bus Eater is easily one of the most famous surf waves in the world, but it doesn’t “come in” until the flows are great than 14’. Below that level, it is basically a big, mean hole that you don’t want to be anywhere near. It resides at the bottom of Lorne Rapid which consists of a magnificent wave train down river right, so it is theoretically a simple matter to avoid Bus Eater at the bottom. Of course, nothing is ever, ever simple. As we approached the top of the rapid, Dane said to me, “Pat, the top wave is the perfect wave to try a kick-flip. Watch me do one and then you try it.” Rather than fully describe this to you, I will refer you to Wikipedia and suffice it to say that this move was way beyond my ability, not to mention a bit crazy to try considering I had never been down the rapid before with Bus Eater lurking at the bottom. But remember that little pact I made with myself? What the hell! Moments later, I watched Dane launch himself off the crest of the first wave and completely roll his boat as it soared through the air! I approached the wave with as much speed as I could conjure, pulled hard off the lip of the wave, and tried my damnest to corkscrew my boat and myself through the air! All I know for sure is that I launched myself into the Wild Blue Yonder, didn’t pull off the move, and spent a fair bit of time upside down on the subsequent waves. The other thing I know for sure is that I got the courage up to try something that I never, ever thought I would try! The bottom of Lorne Rapid also featured a great surf wave named Waikiki with the most exhaustive eddy-service I have ever experienced. Once again, I put my fears aside and managed to get two decent surfs on this wave that made almost everything in Colorado seem puny by comparison. Wednesday’s lunch? Earned it.
Once again, it seemed like there wouldn’t be anything more to fear on the river, but Coliseum Rapid waited half a mile above the take-out with what seemed like the sole purpose of inspiring awe in us. The entire river converges and simultaneous drops about twenty feet with the result being a string of massive waves that behave erratically with occasionally crashing fronts. And just to spice things up, there is a ten foot high, 150 yard wide pour-over down stream of the waves. Once again, that is a place you don’t ever want to find yourself. A testament to its potential danger is the fact that commercial raft companies employ jet boats to pick up swimmers who weren’t so lucky in Coliseum. The day we were running it, the commercial trips deemed the flow to be too high for them to run it safely. Gulp! For all the build up and potential consequences, Coliseum actually paddled quite easily, save for the fact that I got surfed at the crest of the 3rd wave! Wow, what a river!
Since I have returned from my trek to Mecca, I mean…, the Ottawa, I have been asked on numerous occasions about the most important thing I learned. It is a great question and one that I’ve pondered for several weeks now. After all, I spent 5 days kayaking with EJ, who is undoubtedly the best kayaker in the world, and that time was spent on the Ottawa, which is one of the premier rivers in the world.
First off, although I didn’t learn this for the first time during this week, I was reminded once again how great the people are who kayak. It has been, and remains one of the main reasons I spend so much time on this activity. My comrades in the class were all exceptional on the water and off, and the entire Jackson family was a blast to be around for a week.
As with any difficult pursuit, whether it be golf, skiing, or in this case, kayaking, there is no Golden Ticket that takes you from rank beginner to expert. And so in five days on the water, I wasn’t surprised that my ability level didn’t improve dramatically. But like I said, there were intangibles that I gained that will stick with me, the main one being the courage to try that which is within my ability but that I fear. And what I also learned was not a single skill, but a plan that will allow me to progress and continue to achieve at a higher level. I have summarized the game plan in three steps that are no-duh obvious to most people but that are firmly ingrained in me now.
Fundamentals: EJ describes these as “the rules of the game”. These are the skills that he goes over in great detail in his “Strokes and Concepts” and “Rolling and Bracing” videos. I had been working on these skills throughout the season and the class was very beneficial in terms of correcting bad habits and explaining proper technique. Equally important was the fact that I was able to witness that EJ and Dane focus on these fundamentals all of the time! In order to be great, you need a great foundation!
Repetition: Learning the Fundamentals is not sufficient to become great; you need to repeatedly reinforce those skills through repetition! Once again, I got to see this in action by EJ and Dane all of the time and I have no doubt about how important it is to their success. And, I came to the conclusion that Repetition is something that can be experienced on multiple time scales. The roll can be practiced repeatedly over the course of 5 minute warm up. We are all familiar with this type of repetition, but I think it is equally important that it be practiced over the course of the day on the river and over the course of the entire season. I can’t count how many times I looked over and saw Dane practicing his roll throughout the day. And I have no doubt that he continues to practice it day-in, day-out. That continued level of repetition of the fundamentals at all of those time scales is absolutely necessary for them to become second-nature and there for you at the times when you really need them. Another aspect of repetition that I had never really given thought to or witnessed previously was Dane’s persistence in running the same stretch of river multiple times in a row. Again, I can’t count how many times I looked over and saw him hopping out of his boat, running back up the shore, and hopping in again in order to get another go at the rapid. By Thursday, I had subconsciously caught on to this and found myself running 4 stretches of the river a second time, just because I wanted to. This isn’t only a great approach to getting better, it is also extremely practical. When you consider you much time and effort is expended getting to the river, setting up shuttle, driving home, and all the other little details, the amount of time to run a fun rapid a second time is absolutely minimal! So what if it’s going to take me 10 minutes to walk back up and do it again- I spent 5 hours driving to get here this weekend to do just this!
Staying Positive: Kayaking is an extremely challenging activity. It is part of the reason why it is so fun, but it can also get people into a funk. I am always hearing about “the mental side” of kayaking or rolling, and I have certainly experienced that myself. That mental side is basically when you tell yourself that something might go wrong, or you might not be good enough. In the five days on the river with EJ and countless conversations off the river, I don’t think I ever heard him say something negative! That means that in thousands, if not tens of thousands of situations, he always, always chose to be positive! Wow, what a difference that makes! One of his Fundamentals is to “Always look at/focus on your target.” Always being positive is the ultimate expression of this rule. It not only allows you to achieve your goals and avoid the pitfalls, but it almost guarantees that you are having fun when you make those goals a reality. It is the difference between “making it through” and having a great time.
Like I said, the three steps in this plan are nothing earth-shattering, but I now fully appreciate them and have made them part of how I will be kayaking.
Finally, (wow, you read all the way down to here?!) I managed to pull together some photos and videos that I captured while on the river as well as some from some other sources. I hope you enjoy them!
-Pat
Video compilation, but Youtube removed the soundtrack :-( You can download the video below to your computer for posterity and some great tunes!
49 hours after leaving Boulder, CO, I arrived at the Wilderness Tours resort on the Ottawa River. So far, the plans that I laid out in my New Year’s Resolutions have proceeding beautifully. I love the concept of combining separate goals into an intertwined super-goal so that each portion becomes dependent on the other and is therefore, that much more likely to be accomplished. Tying the EJ kayaking clinic to have a fully working new engine in my van is the example that I am currently fond of. The van performed beautifully with the new Zetec engine as well as the recently added air conditioning and ARB fridge. The very thought of driving close to 2000 miles across the country and into another country during the heat of summer is not something I would have entertained last year. But with the new engine and improvements that I managed to somehow sneak in during the past few weeks among my 50 days of kayaking this year, I was able to make it here in relative expediency and at relatively low cost. And because of the lower cost, attending the clinic was that much more attractive financially than if I had flown and stayed in a cabin all week. Intertwining the goals forced both to happen, rather than allowing either or both to slip away into becoming “almosts”. (I almost spent a week getting better at kayaking with personal instruction from EJ, or I almost fixed up my Westfalia into a road trip worthy vehicle.)
Anyhoo, I’m all set up in my van with the top popped, the chairs swiveled, tables deployed, and tarp hanging off the side in case of rain. And as I feared/wondered, dogs aren’t actually allowed at the resort, so River will be spending a bunch of time inside the van instead of following me around everywhere off leash.
I met with EJ and the other kayakers at 8pm tonight to oriented for the week. The great news is that our class is extremely small- only 4 of us! I know that it is going to be wonderful instruction and that our group is going develop a strong sense of camaraderie and wind up teaching each other almost as much as Eric can. Off to bed for a big week that I’ve been looking forward to for a long time!
I finally kayaked the Numbers section on the Arkansas River after 7 seasons of fearing the class IV run! Here I am celebrating after rapid number 1 went extremely smoothly.
It was a beautiful, warm, sunny day in the Arkansas River valley which was in stark contrast to the cool, rainy months that characterized Colorado kayaking for most of 2009. The river was flowing at 1160 cfs, which was a nice, manageable level for the first time down this classic stretch of water. Our solid group of kayakers chugged through rapids 1 through 6 and all of the intermediate “boogy water” with no issues to speak of. The combination of 42 days of kayaking this year, my commitment to my roll during the late winter months, and the Colorado Whitewater boating class I took late in the spring led to a wonderful first experience and the satisfaction of fulfilling one of my New Year’s Resolutions! It was so much fun that I plan to do it again this weekend!
And how can I not mention the run down the Taylor River that we did on Saturday? I think the Taylor River is my favorite river in Colorado! It is a quintessential mountain river with large boulders strewn throughout and shores that rise steeply into cliffs, pines, and aspen. The water is fun class III+ at the 400 cfs level that we experienced and I think it would be even more fun with some extra water. There is no doubt in my mind that I will be returning to the Taylor in the future!
I attended Colorado Whitewater's annual Training Camp this past weekend and had a great time helping out by sweeping on Saturday and Sunday. We had a really great group of folks and I managed to grab a few photos, so I thought I would post them for the whole crew to see. Hopefully, I will get a chance to get back on the water with some of them again!
Edit 5/21/2009: The G.E. plugin is killing performance on my PC and since it wasn't too impressive, I have removed it from this post.
It is now incredibly easy to embed Google Earth into a blog or website, with the results that you see (maybe) below. However, I'm not sure how effective of a tool this really is. On the one hand, it allows a viewer to explore information without actually having Google Earth installed (although the plugin must be installed in the browser). But on the other hand, the functionality is limited compared to the full version. In particular, I wish that it allowed for a tour to played of waypoints, the way that it can be done in the full version. It also appears that photos within waypoint captions are not being displayed at all :-(
In any case, if you want to embed a KML/KMZ file of your own blog, this tutorial is really easy to follow.
The weekend began with yet another April blizzard along the Front Range, but ended with warm, sunny weather in the Utah desert!
I began Friday (4/17/09) by battling awful road conditions through Clear Creek Canyon and up I-70 and was treated to lack of heat in the van during the blizzard as my thermostat decided to flake out on me. (Oh well, another project for next weekend.) But hot or cold, I was lucky to make it through the rough conditions. Laurie, who had the Westwater Canyon permit, got delayed for hours and eventually stuck in Dumont, CO after I-70 was closed. Good thing I made it through there 2 hours earlier! A few hours later, I met up with Kim and Brad in Fruita, where we modified our trip plan slightly. Even though Laurie had most of the food and kitchen gear, we were able to purchase some food and forge on through Ruby-Horsethief canyons on our own. Or perhaps you were able to infer most of this by tracking my progress on the web? :-)
Saturday proved to be much warmer than Friday, with temperatures in the high 50's and sunny skies. The water was moving quickly and thanks to our boat rigging the night before, we arrived at the Black Rocks camp by mid-afternoon just in time for siesta on the beach! I followed my nap up with a hike to the rim above the river and was able to capture the settings below on film.
Sunday was even warmer and the hot desert sun quickly reminded me of newly acquired sun burn from the day before. We broke camp at a reasonable time and arrived at the Westwater Ranger station by 1pm, where Laurie and the rest of of our group was waiting for us. The rest of the day was a continuation of our mellow float and we camped at Upper Little-D with all the whitewater waiting for us the following day. A great dinner and great company around the campfire topped off the day.
Monday was a rush of rapids in succession that gave way to another warm, sunny float to the Cisco take-out. Best of all- no wind! Of course, I couldn't be satisfied with merely rowing my raft through the whitewater. No, I had to use my new waterproof camera to make a movie of the experience, and Raft-Cam was born!
Sure the camera angle could use a little work, but it is still pretty cool! And if that isn't enough action for you, check out the photo, GPS tracks, and Google Earth files below!
Geotagging is basically the process of associating location with photographs and can be accomplished in many ways. I have developed a process using a commercial product called RoboGEOthat not only geotags the photos, but also creates KMZ files that allow the photos and associated GPS data to be viewed in Google Earth. Here is the procedure I use...
Start RoboGEO
Select images to be geotagged by following Step #1 in the left pane. This should probably be the set of images that were considered the "best" images in the Digital Workflow, although you may want to select a subset of them. All of the photos that are to be tagged should have time tags that correspond to GPS track data, or else the application will not know where to place them.
Select the GPX file that was previously created in Creating a GPX Trip File as the location data for Step #2 in the left pane by selecting From a tracklog file. When you do this, RoboGEO will determine the location of all the photos by comparing their timestamps to those from the GPS tracklog and interpolating as necessary. The Latitude, Longitude, and Altitude will now appear in the Photos pane of the application. You can now save this project by choosing Save Project.
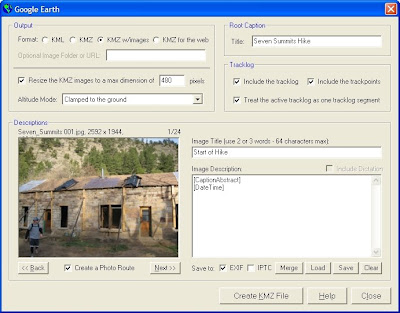
For Step #3 in the left pane, choose Export to Google Earth with the following settings:
The Title should be manually set to describe the project you are creating. This will be the top level description in Google Earth.
The Image Description is configured to automatically read the Description from the IPTC header that was added by PixVue and the EXIF timestamp that was added by the digitial camera at the time the photo was taken. Be sure to Save this information using the Save button to a file that I call GeoCaptionTemplate.txt. You will then be prompted to apply the same fields to the Image Description of all the photos which will save you some time, so do it. If you start a new project, you can then just Load the GeoCaptionTemplate.txt and apply it to all the Image Descriptions and you are off and running.
Manually enter short descriptions for the Image Tile and select Save to EXIF. This field is used to label the waypoints in the navigation pane of G.E., which will otherwise be labeled with the image name. Saving this to the EXIF header will prevent you from having to re-enter this information if the image is used in another RoboGeo project in the future while leaving the IPTC header information intact.
Select the Create KMZ File button which will automatically build the KMZ file and launch G.E.
Change the view in 3-D in Google Earth to create a favorable correspondence to each photo (correct heading, elevation, and position), then right-click on the corresponding waypoint in the Places pane, and select Snapshot View. I recommend that Elevation Exaggeration (under Tools->Options->3D View) be set to 1.0 to reduce possible viewing conflicts when other viewers open the file.
Now when you double-click on that waypoint in the Places pane, it will return you to the viewpoint that you just assigned. You will need to click once more to then display the photo in a pop-up window.
Add any additional waypoints from the GPX file that were not included automatically by RoboGeo. Open the appropriate GPX file that contains the waypoints, make them visible in the Places pane, and finally, drag them from the Waypoints section under GPS device to the Waypoints section for the KMZ file that is being edited.
Add any additional information to the top-level heading in the Places pane by right-clicking on it, selecting Properties, and adding text to the Description section. I typically add a short description of the file contents, a copyright notice, and a link to my website.
Save the KMZ file by right-clicking on the top-level heading in the Places pane, selecting Save Place As, and choosing the same file that you have been working on.
You are done! Now just make the file available to your friends and family!
I have strived to present the photos, videos, and GPS data from my adventures on this site in my effort to tell my digital. stories. and along the way I have developed a workflow that I typically use. Yes, it is a lot of time, but it is enjoyable and the end result is a very rewarding personal record that I can share with others.
These processes are not set in stone by any means, and I have not had an opportunity to write about all the steps yet in other blog posts. Therefore, this post will be edited and updated as I learn new methods and alter my techniques. I will also try to update the post date each time, so that it moves to the top of my page.
Before each trip, I attempt to do the following:
Set the camera date and time of each of my cameras and those of my compatriots to the correct time. I have not yet determined if using local time is best, since it may cause problems when correlating with GPS data.
Bring extra batteries for each of my cameras and electronics devices.
After each trip for which I have generated substantial photos, videos, stories, and GPS data, I attempt to do the following:
Import (copy) pictures, videos from digital camera to PC using my conventions for filenames, folder structure. Always give files unique names! Otherwise, applications such as JAlbum will get extremely confused with duplicate file names.
Use PixVue and/or MS Pro Photo Tools to add common metadata to entire collection of photos. If the camera times were not correctly set prior to photographing, Pro Photo Tools can easily correct the times assuming you know the correct offsets to apply.
Move all photos into a subdirectory named "All"
Select best photos and copy into the main directory of Step 1. (Note: This subset of photos can also be used to generate a Blurb book or a playable DVD presentation of the photos.)
If you have wondered why my blog is titled, "digital. stories. by Patrick Brown", this stream of consciousness may provide some answers.
Digital data may be used as a means of telling stories. Dumping a bunch of photos on the web tells a story about as well as dumping of bunch of random words on a written page. Using new digital media (photos, videos, virtual reality panoramas, time lapse photography, GPS, Google Earth, MotionBased Player, Blurb) to tell stories is an art form just as photography, painting, and music are art forms-- only the tools have changed. It is a chance to explore and create new methods that have never been done before that can immerse a reader/viewer in another world that would never have been possible even a few years ago with all the money in the world.
This blog is used to tell my stories and explains what I have learned about digital story telling. I guess my idea of digital story telling is a little different than most people's, but nonetheless, the idea is to use these technologies as means of conveying a sense of Place and Time and Adventure.
Digital media is just data until it is conveyed in a relevant manner. This is where the art of story telling meets the technology of the digital age. As individuals, today's digital technology is allowing us to generate massive amounts of data that is linked to the memories of our lives, but we are struggling to use this data in a truly useful way. We dump photos on our hard drives with incomprehensible names like img_031567.jpg, or if we are more advanced, we load them to sites like Flickr, Picassa, or worst of all, Snapfish. Photos get dumped into buckets and emails sent to friends and loved ones, but no stories are shared. While it is still wonderful to see these photos, the memories associated with them and the images themselves will soon be forgotten when presented in this manner. There are no stories associated with the images, just pixels. Maybe a few tags or keywords slung here or there, but no systematic labeling or organization of the photos. Photography can be expanded in both space and time to provide an extremely immersive experience in the form of panoramas, virtual reality panoramas, video, and time-lapse video.
And GPS is now providing us with the exact locations we have visited, but rarely ever used to convey the sense of place of our ventures. Combined with the various visual elements from a digital camera and presented in the right viewing environment, a user can now fully explore and see a story unfold before their eyes, on their time, and in the comfort of their favorite chair. This is what I call digital storytelling, and this is how I am striving to share my life adventures with my friends and family.
Here is a nice procedure I have developed for concatenating several days worth of GPS waypoints and tracks into a single GPX file. The end result is a compact, neat file that hierarchically contains each day's track and waypoints with appropriate descriptions. This file can be easily shared and viewed intuitively in most mapping programs, including Google Earth. This procedure is written based on the procedure I used to record data to my Garmin eTrex Vista Cx as described in this previous post.
Extract waypoints from the GPS using Garmin Mapsource. Delete all non-relevant waypoints from list view and save remaining waypoints to ProjectWaypoints.gpx.
Copy all GPX track files from GPS expansion memory card to PC. (One for each day of the trip.)
Open up ProjectWaypoints.gpx in firstobject XML editor and save as Project.gpx.
Open up the first day's GPX track file in another instance of firstobject XML editor.
Merge or delete separate tracks from the first day to create a single track for the day. Mapsource is useful for identifying and deleting extraneous points. firstobject XML editor or Notepad can be used to manually merge two track segments (XML tag = ).
Copy the track from the first day and paste into Project.gpx at the same level as the waypoints. In order for the Copy/Cut/Paste functions to be available, you will need to double-click the item you are copying or where you are pasting. This will highlight a chunk of the GPX file, and you will then know that you have copied or can paste.
Repeat the process for each day of tracks.
Edit the name for each waypoint and track in Project.gpx. (The tree view can show the name of each waypoint in firstobject XML editor if the following lines are added to the Tree Customization box under Tools->Preferences: trk name and wpt name.)
The GPX file can now be opened in other applications (Google Earth, Mapsource, etc) and will show all the relevant geographical data for the trip while allowing individual tracks for waypoints to be toggled ON or OFF. If viewing in Google Earth, be sure that View->Show Time is set to Never, or G.E. will only show the track for the currently selected time frame.
After some trial and error, I have a nice method of recording GPS data on multi-day trips that is useful both during and after the trip. I typically use this procedure on backpacking, biking, and rafting trips when I will be sequentially moving from one location to another. In these case, I like to know how far I have traveled in total as well as my mileage for the current segment of the trip. This procedure is based on the Garmin eTrex Vista Cx that contains a microSD expandable memory card. The card can be used to hold topographic and street maps, as I described in this post, and can also be used to store track data. This turns out to be a very useful feature, since the built in capability to save maps is inherently flawed for a few reasons. First off, the available memory for saved tracks is limited to the built in memory, which may not be sufficient for longer excursions. Second, the tracks are saved in a Garmin proprietary format which requires Mapsource to extract them and then convert them to GPX format. Finally, and most importantly, the process of saving tracks results in truncated data. The time of each waypoint within the track gets deleted which makes geotagging photos impossible, and some people have even reported that waypoints get deleted.
Hopefully, I have convinced you that it makes more sense to store your tracks to the microSD card! So let's get started!
Make sure you have fresh batteries. I replace mine every 2-3 days when used for 6-8 hours per day to make sure I don't have any data drop outs.
In the GPS go to Main Menu->Tracks->Setup->Data Card Setup and enable the "Log Track To Data Card" option.
Enable track logging, by choosing the "On" option at Main Menu->Tracks. One of the nice aspects of this procedure is that you do not need to manually save or clear your tracks each day the way you would need to if you were using the built in memory. I should mention that there is an undocumented bug that can ruin your GPS if you clear the track log when it is turned off. I did this and it completely destroyed the software on the unit. Fortunately, Garmin sent me a replacement for free.
I primarily use the Trip Computer page to monitor my trip progress in real time. As I previously alluded to, each day I make sure to reset the Trip Odometer on the Trip Computer page, but I do not reset the Odometer. This provides real time monitoring of the distance for each day and the entire trip.
I mark each day's camp and other significant locations with waypoints on the GPS. A very quick method of marking a waypoint is to press and hold the 5 way rocker key. Often times, I just press okay rather than laboriously typing in a description for the waypoint.
Finally, I carry a small notebook that I jot down the locations I have traveled each day, the names of camps, and descriptions of interesting waypoints. I find that this makes adding descriptions to the GPS data much easier and more accurate when I finally get to looking at it back home.
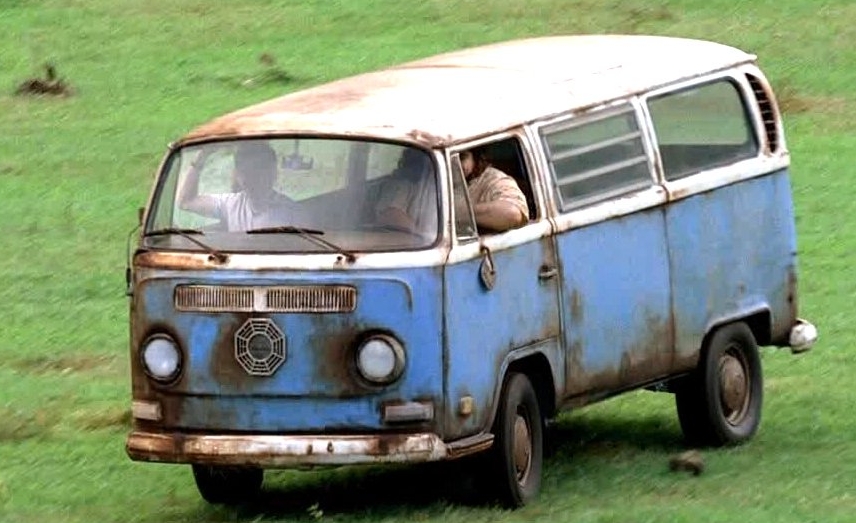
I am heading out to raft the Colorado River through Ruby/Horsethief/Westwater canyons at the Colorado/Utah border this weekend, and I found a cool, free website that will allow me to embed a map with my current location into my blog. It is called SPOT Trip Manager, and it seems to be a free service that is hosted by an individual named Jason Jonas who likes to take big motorcycle trips. I love how the web can deliver up almost anything you ask for thanks to resourceful individuals like Jason. It reminds of the "magic box" on Lost that will deliver to you whatever you can imagine! Now if only SPOT will add this capability to their website the way Youtube includes it.
(Update- 4/6/09: The San Juan trip fell through due to attrition, so no updates for it.)
So anyway, here is the map with my most recent locations!
My kayaking season had to begin somewhere with flowing white water, and the class III Shoshone run on the Colorado River seemed like a nice way to ease back into the cold April water. Plus, it seemed fitting that the van's first long voyage away from Loveland Pass should take it Glenwood Springs just like it did last year!
I met up with Vlad on Saturday afternoon, and we did two fun but chilly runs down the one mile stretch of rapids. And I was able to get a few photos and videos with my new waterproof Olympus Tough 8000 camera! I'm looking forward to lots more boating and water photos this year.
Once again, I camped at the Glenwood Resort campground within 20 feet of the river. The exhaustion of kayaking the cold river in 45 degree temperatures coupled with a late Friday night out seeing the Wailers must have really caught up to me, because I slept 13 restful hours Saturday night! After some coffee and quiet reading Easter morning, I headed up the highway a few miles to the Hanging Lake rest stop. I have intended to hike up to Hanging Lake on many occassions, yet it never happened until Sunday. It's a moderate, 1+ mile hike from the rest area, and the trail was covered by snow for about half the distance. It is definitely worth it though. The lake is perched on the side of cliffed wall with water pouring over lips into the aquamarine pool. If you have 2-3 hours, be sure to check it out for yourself!
When the day was over, I had been asked this by at least four separate individuals. And to think that I had never heard of this trick before this week. Unfortunately it didn't help, and I needed a bigger metaphorical hammer to get my van moving in the snow again.
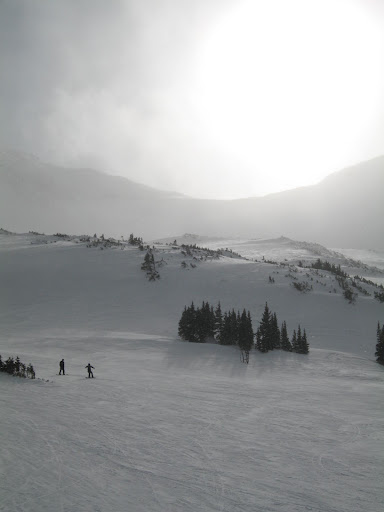
The spring snow storms have been continuing here in Colorado, so I decided to venture up to Loveland Ski area and sleep in the Westfalia last night. The anticipation and excitation built within me during the last hours of work on Friday, since at least a foot of snow was predicted to fall overnight with similar amounts throughout Saturday. My plan was beautiful. I would drive my souped up van to the ski area, sleep blissfully in propane fired warmth, and awake to a foot of snow and first chair while all the other suckers in Colorado battled the elements and each other on I-70 to make it up to the mountains.
The plan began great too. I made it up to Loveland quickly with favorable road conditions, but then I faced the issue of where to park the van over night. If I parked in the middle of the lot, I risked getting asked to move by plow trucks. If I parked at the exit on the side pull-off, I risked getting plowed in and having to listen to 18 wheelers drive within 15 feet of my bed all night. So I opted to park next to the snow cat operators trucks at the edge of the Loveland parking lot near the maintenance building. I would blend in with them and wake up early to gobs of snow and the best skiing of my life- a tremendous plan. I spent the evening chatting on the phone, watching a movie on my laptop, and drinking hot chocolate with Bailey's. I have to say that it was all quite civilized up to that point when I turned in at midnight to catch some Z's.
I discovered that there are some serious issues with camping in your van in a ski area parking lot and that they are compounded when it is snowing out and you are parked next to the maintenance shed. First off, the snow cats like to go out and groom for a while and then return to the shed for a while. And when they do, their engines idle loudly and their ultra bright lights illuminate the entire area. And for some reason, they go out on missions for a while and then return, and they do this several times over the course of the night. Of course, I was paranoid that they would discover the imposter in their parking lot and they would kick me out. I don't like snow cats quite as much any more. Second, guys who operate plows must really love their jobs, because they don't just plow a row once. They do it over and over and over again. And they don't seem to mind plowing snow right up to parked cars. Maybe the pull off parking spot wouldn't have been so bad after all. Finally, Loveland and CDOT like to blast for avalanches early in the morning. There's nothing quite like explosive charges to get your day going.
With all the racket and my paranoia, I probably got about 3 hours of sleep between midnight and my alarm at 7am. To top things off, the propane ran out some time during my slumber, so I awoke to freezing conditions inside the van and the inability to make coffee and toast in the van. Suddenly, things weren't quite so civilized any more. No problem, I thought. I will start the van to warm things up, get my ski clothes on, grab breakfast in the lodge, and blast through feet of fresh powder. Not so fast sonny. The forecast was a little optimistic in terms of snow accumulations. I would say that there was 6-8" of fresh snow, which was still good, but not the blizzard I had hoped for. Alright, turn the key to start your wonderful new Zetec engine- rrrrr, rrrrr, rrrrr. Ah crap, did I mention that the only piece of the van that I didn't replace during the engine conversion was the starter and that it started having "issues" with the solenoid not engaging the gear teeth last week? When I talked to Brady at Bostig on Wednesday, guess what he asked me? "Did you hit it with a hammer?" So on Tuesday, I crawled under the van, tapped the starter with a hammer, played with the gear shifter position, and got it started. It started without issue the rest of the week, so I thought I was in the clear. Apparently not.
SUVs, trucks, and Suburus began to pour into the parking lot and now I had to figure out how to start my van- crap, definitely not civilized. All of these Front-Range-get-up-in-the-dark-to-drive-I70-suckers were going to beat me to the fresh snow and I was going to be stuck working on my van one more weekend. At that point, I began to get a tad frustrated. Lack of sleep, hunger, cold, and a failed plan do not make a happy Pat. I donned my cold ski clothes, climbed under the van in the snow, and did my best to hit the starter with a hammer. Rrrrr, rrrrr, rrrrr- still no dice. Screw it, AAA will bail me out later in the day if worse comes to worst, I'm going skiing. So I spent the morning telemarking through some fantastic powder conditions. The snow wasn't particularly deep, but it was a great consistency, the mountain wasn't too crowded, and I skied really well. Loveland is a really cool place to be on a powder day, but that day can only last so long before exhaustion sets in and it's time to head home.
I wandered back to the van determined to get it started by hitting it with a hammer. I struggled from every position imaginable, but it just wasn't happening, so I did what every normal guy does when he gets stuck (actually, no I didn't drink a beer), I stood there and and just stared at it. Along comes a dude who says, "You got a Suby engine in there?" Sweet, this guy know these vans and will be able to help me some how. I tell him about the Zetec and my crappy starter, and guess what he says? That's right, "Did you hit it with a hammer?" and then he wandered off to better times on the mountain side. At that point, I knew there were only two options- some how get the van out of the parking space and moving, then pop the clutch to get it started and drive back to Boulder without shutting off the engine, or I could be a loser and have AAA tow me home. Time to find some one with a truck to yank me out of the parking space.
All of a sudden, being parked next to the maintenance shed wasn't such a bad thing. A bunch of guys were hanging out by the door, so I explained my situation to them and quickly had a few guys with a two-wheel drive dump truck trying to pull me out of the parking space. I quickly discovered that there is an inherent problem trying to pull a vehicle out of a ski area parking space. You see, these guys park as many cars a possible into the lot so the ski area can make as much money as possible. That means that there are narrow rows between the tightly packed cars and that my stuck van had to be pulled by a tow strap out into the row at an awkward angle without hitting the cars parked next to me. We tried several combinations of different trucks, different angles, and different drivers before ultimately finding success and unbeknownst to each other, every one of the drivers asked me "Did you hit it with a hammer?" regarding the starter! We finally extracted the van without damaging any other vehicles and got it moving down a hill where I popped the clutch and started the van! I felt strangely like Hurley on Lost and Greg Kinnear in Little Miss Sunshine. Apparently jump starting a VW bus is a right of passage for owning one of these vehicles, and I can now check that off of the list of odd things I have done in my life. I left the engine idling, hopped out and thanked the dump truck dude profusely with handshakes and my remaining Alaskan Ambers. An hour later, I was back in Boulder zonked out on my couch with a roaring fire. That's what I call civilized.
The Colorado Front Range had only received 2 inches of precipitation in the past 5 months and it had been balmy throughout the new year, so we all knew we were bound to get smacked with a spring blizzard. The snow came Thursday (3/26) morning and dumped a foot and a half in Boulder. CU was shut down and the governor declared a state of emergency to pull stranden folks off of US-36. To me, it was a nice opportunity to take some photos of surreal shapes in my front yard and to get out cross country skiing with Mike. Enjoy the photos!
Today marks the second week I have had my Zetec up in running in my 1985 Westfalia! I had already put 300 miles on it, so yesterday I gave it a thorough check out and everything looked great.
This morning, I drove it up I-70 in Colorado to go skiing, which was the final exam of this whole process for me and the Zetec. The main reason I put the Zetec engine in was that I wanted to be able to take the van all over Colorado up and down steep, high altitude passes on a regular basis at normal highway speeds and without worrying about breaking down. There are 2 or 3 hills on I-70 that are absolute killers, and I got to test out the Zetec on one of them just west of Georgetown.
I can't believe how incredible the Zetec is in my Vanagon! Joe came down and provided a tremendous amount of help to me this weekend, and we got the van running beautifully today, 8 days after I tore out the old VW waterboxer engine!
I will let video speak for itself (PG13 for language)!
It was another long day and a great conclusion to the weekend to be able to see the Zetec mounted in the van!
There was a lot of incidental work like figuring out how to take apart (put back together) CV axles, mounting brackets in the engine bay, transferring equipment to the new transmission, and finally mating the transmission to the engine. Fortunately, Joe came over and helped me, and since he has already been through the process, it was much, much easier. Finally at about 7pm , we got the engine and transmission up and bolted into the van without support from the engine hoist. There is still a lot to do before turning the ignition key, but I'm starting to see the light at the end of the tunnel!
Check out another video diary from today's efforts.
It was a long day, but when all was said and done, my VW camper van was without an engine and I was happy about that!
I had to remove the old WBX engine in order make room for the new Zetec (not at all unlike John Locke having to die to save the "Island" on Lost), and today was the day to get the work done. Thanks to the wonder of craigslist, I found another VW fanatic named Todd who helped me remove the engine. It was a huge help to have him there, since he had previously removed several engines from Vanagons; not to mention that two sets of hands really makes a difference when doing that kind of work.
It was a full-day affair, and since many people have wondered exactly how long it takes to remove an engine and install a Zetec as part of the Bostig conversion, I decided to make a video diary for the day. I'm hoping to make one for the installation process also, but 'till then, check out what I did today...


 If you want to know if you enjoy where you live and can really call it home, spend 17 days and 4500 miles driving across the country and back. If, like me, you are utterly relieved and simultaneously overly joyful when you cross your state line again, then chances are that you like where you live and can call it home!
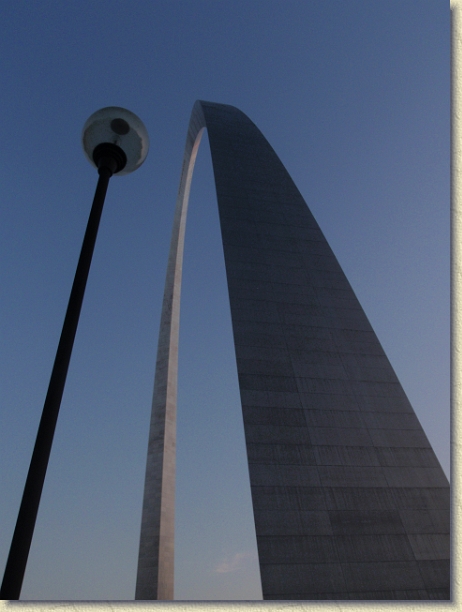 I specifically chose a different route home so I could see the Gateway Arch in person. A PBS documentary piqued my interest a few years ago, and I told myself that I would make a priority to see it the next time an opportunity presented itself. My evening arrival in St Louis presented the scene with great light, which I used to my advantage as I photographed bunches of perspective shots of this unique American monument that are posted in
 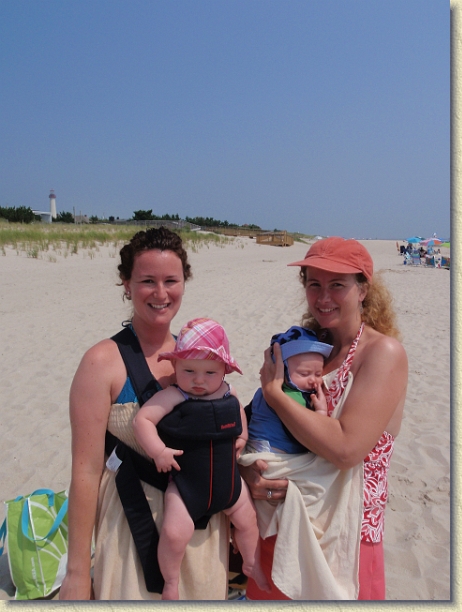 One of the best aspects of


 As we approached the top of the rapid, Dane said to me, “Pat, the top wave is the perfect wave to try a kick-flip. Watch me do one and then you try it.” Rather than fully describe this to you, I will


 And how can I not mention the run down the Taylor River that we did on Saturday? I think the Taylor River is my favorite river in Colorado! It is a quintessential mountain river with large boulders strewn throughout and shores that rise steeply into cliffs, pines, and aspen. The water is fun class III+ at the 400 cfs level that we experienced and I think it would be even more fun with some extra water. There is no doubt in my mind that I will be returning to the Taylor in the future!


 My kayaking season had to begin somewhere with flowing white water, and the class III Shoshone run on the Colorado River seemed like a nice way to ease back into the cold April water. Plus, it seemed fitting that the van's first long voyage away from Loveland Pass should take it Glenwood Springs