Geotagging is basically the process of associating location with photographs and can be accomplished in many ways. I have developed a process using a commercial product called
RoboGEO that not only geotags the photos, but also creates KMZ files that allow the photos and associated GPS data to be viewed in
Google Earth. Here is the procedure I use...
- Start RoboGEO
- Select images to be geotagged by following Step #1 in the left pane. This should probably be the set of images that were considered the "best" images in the Digital Workflow, although you may want to select a subset of them. All of the photos that are to be tagged should have time tags that correspond to GPS track data, or else the application will not know where to place them.
- Select the GPX file that was previously created in Creating a GPX Trip File as the location data for Step #2 in the left pane by selecting From a tracklog file. When you do this, RoboGEO will determine the location of all the photos by comparing their timestamps to those from the GPS tracklog and interpolating as necessary. The Latitude, Longitude, and Altitude will now appear in the Photos pane of the application. You can now save this project by choosing Save Project.
- For Step #3 in the left pane, choose Export to Google Earth with the following settings:
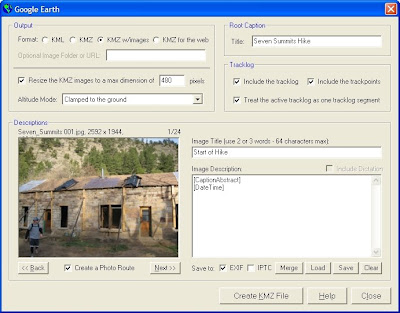
- The Title should be manually set to describe the project you are creating. This will be the top level description in Google Earth.
- The Image Description is configured to automatically read the Description from the IPTC header that was added by PixVue and the EXIF timestamp that was added by the digitial camera at the time the photo was taken. Be sure to Save this information using the Save button to a file that I call GeoCaptionTemplate.txt. You will then be prompted to apply the same fields to the Image Description of all the photos which will save you some time, so do it. If you start a new project, you can then just Load the GeoCaptionTemplate.txt and apply it to all the Image Descriptions and you are off and running.

- Manually enter short descriptions for the Image Tile and select Save to EXIF. This field is used to label the waypoints in the navigation pane of G.E., which will otherwise be labeled with the image name. Saving this to the EXIF header will prevent you from having to re-enter this information if the image is used in another RoboGeo project in the future while leaving the IPTC header information intact.
- Select the Create KMZ File button which will automatically build the KMZ file and launch G.E.
- Change the view in 3-D in Google Earth to create a favorable correspondence to each photo (correct heading, elevation, and position), then right-click on the corresponding waypoint in the Places pane, and select Snapshot View. I recommend that Elevation Exaggeration (under Tools->Options->3D View) be set to 1.0 to reduce possible viewing conflicts when other viewers open the file.
- Now when you double-click on that waypoint in the Places pane, it will return you to the viewpoint that you just assigned. You will need to click once more to then display the photo in a pop-up window.
- Add any additional waypoints from the GPX file that were not included automatically by RoboGeo. Open the appropriate GPX file that contains the waypoints, make them visible in the Places pane, and finally, drag them from the Waypoints section under GPS device to the Waypoints section for the KMZ file that is being edited.
- Add any additional information to the top-level heading in the Places pane by right-clicking on it, selecting Properties, and adding text to the Description section. I typically add a short description of the file contents, a copyright notice, and a link to my website.
- Save the KMZ file by right-clicking on the top-level heading in the Places pane, selecting Save Place As, and choosing the same file that you have been working on.
- You are done! Now just make the file available to your friends and family!

No comments:
Post a Comment