Showing posts with label gps. Show all posts

Thursday, September 6, 2012

BVCB Bike Tour

The BVCB gang with Mt PrincetonAlthough the 2012 drought has been less than ideal for kayaking, the upshot has been that I’ve been able to get out on my mountain bike more this year than in the past several years combined. So when my good friend, Scott, suggested a Labor Day weekend bike trip from Buena Vista to Crested Butte, CO, I couldn’t refuse. Originally, he intended the trip to extend from Colorado Springs to Loma, CO (original route map) and to be self-supported (everyone carries all of their own gear), but things don’t always go as planned. Instead, the route encompassed just 3 days of biking on back roads, forest service roads, and single track, and support was provided by a sag wagon.

The BVCB team consisted of Scott, Dave, Mikelle, Carrie, and myself, all of whom had spent considerable time biking and kayaking in Buena Vista (BV) this year. So it was no surprise when all of us convened at Dave and Mikelle’s new house in BV—aka “Dalton Ranch”—on the Friday night before Labor Day in preparation of the BVCB trip. We departed BV by 9:30am on Saturday, 9/1/2012 with fresh legs and high expectations for the adventure before us. Over the course of the day, we passed by the Chalk Cliffs on the side of Mount Princeton, climbed in elevation, and took a respite from the rain in a creepy general store in the little ghost mining town of St Elmo. After the rain subsided, we made the final push up the steep, muddy road past countless ATV’s to a gorgeous campsite that Dave graciously found for us.

We arrived in Crested Butte!The second day of the tour began with an immediate, steep climb up Tin Cup Pass followed by a rocky descent past hundreds of noisy ATVs to another ghost mining town, Tin Cup. From there, we continued down hill to Taylor Reservoir, then along its north shore, and finally up an endless 6 mile climb to another incredible camp that Dave located. On the third day, the morning treated us to a long downhill ride to our turn off to the singletrack trail known as Deadman’s Gulch. We chose to follow the Rosebud Trail which quickly ascended into alpine fields before intersecting the Deadman’s Gulch trail that switchbacked dozens of times through glades of aspen trees on a steep hillside. After the adventurous singletrack, we found ourselves on a 7 mile dirt road descent that finally led to another 7 mile slog into the wind along Highway 135 into Crested Butte. We arrived 3 days and 90 miles after we left BV and immediately celebrated with pizza and beer at a hole-in-the-wall joint where we reveled over our accomplishments, reminisced about the wonderful times we had, and planned our next biking exploits. Without a doubt, there will be a sequel to this story…

I’m sure that you want to check out the photos and maps, so here they are. But if you want to hear a little bit more about the geeky side of this trip, keep reading below!

If you have spent any time reading my stories on this site, you know that I can’t leave home without an arsenal of gadgets that help me tell my stories and this adventure was no different. By some measures, I was traveling light on gadgets, but nonetheless, I had a GPS and SPOT mounted to my handlebars for location recording and real time broadcasting of our location. There was also a portable, waterproof sound system (ECO Extreme) with my iPhone safely encased on my handlebars that cranked out tunes for all of the long climbs along the trip. And finally, I tested out a small solar panel system by Goal Zero that powered the GPS and charged a battery pack. Overall, the gadgets performed beautifully, although they made my bike a bit cumbersome to handle on the tight singletrack trails.

So what did all of these gadgets actually do? Well, the SPOT provided real time tracking of our location every 10 minutes which was displayed at this Spotwalla webpage, and allowed me to check in on Facebook with our status even when we were far out of cell phone range. While this may have not been critical for this trip, the ability to practice with the device and know that it had its “SOS” capabilities made it worth carrying and using. The GPS provided our cumulative distance, elevation, and speed to evaluate our progress during the trip, and it also recorded a track log and waypoints for post-trip analysis. The simplest form of our track and waypoints is contained with the BVCB GPX file that I created, but for the less initiated, I also uploaded our route to my Garmin Connect site and a new site called Garmin Adventures. One of the cool features of the Garmin Adventures site is that it allows for photos and videos to be included along with the map in a format that other users can download to their PC or GPS.

Of course, I also had my little waterproof Panasonic DMC-TS3 camera along for the ride and managed to snap about 200 photos which provided a perfect excuse to start learning to use Adobe Lightroom. The great thing about Lightroom is that it consolidates tasks that I have previously accomplished via several tools into a single, professional-grade piece of software. After importing the photos, I was able to review, rate, select, and make adjustments on the photos. Finally, I was able to create “collections” of photos that I was able to use to create photo galleries for the web and publish to Facebook. So far I am extremely happy with this new addition to my digital life!

Monday, January 30, 2012

Cape Bird

P1000739There has been a distinct change in the air around McMurdo the past few weeks. While the cracks in my dry skin have been racing those in the sea ice of McMurdo Sound, the arrival of the Russian ice breaker, Vladimir Ignatyuk, advanced the break up of the sea ice in a way that I hope won’t be replicated on my hands. However, the melt of the sea ice clearly lags the air temperatures as the once balmy days are beginning to be replaced with significantly cooler and windier days. After several days of cracking through the McMurdo Sound sea ice, the Ignatyuk cleared a path into the tiny bay near between our dorms and Scott’s Hut and the fuel tanker lumbered into port to resupply the 7 million gallons of fuel that are staged around McMurdo. The sight of water in the sound and the arrival of ships signaled that the Antarctic summer season was rapidly approaching its conclusion.

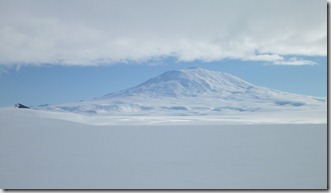
Meanwhile, our own scientific campaign was on its own home stretch. Having successfully completed 2 of the 4 ozone station installations in the previous weeks, we were poised to finish the remaining installations in rapid fire succession beginning Saturday, January 28th, but poor visibility across Ross Island delayed our progress for two days. Then, on Monday, January 30th, we boarded a helicopter under beautiful, blue skies bound for Cape Bird on the north end of Ross Island. The flight path followed the island coastline with a direct overflight of Castle Rock that I hiked the prior day, then skirted the glacial flanks of the southernmost active volcano in the world, Mount Erebus, and finally hugged the rocky sea cliffs just before touching down on a black sand beach. As spectacular as the icy, mountain landscapes were during the journey, the real treat was our first glance of open water in more than a month. In an primal land comprised exclusively of ice, rock, and sky, the introduction of open water as a new element was truly refreshing.

P1000821

The departure from the helicopter onto the beach was filled with the usual hurried movements as gear was quickly loaded into a safe pile away from the landing zone, but then in a surprising sight that surely would not have happened in our previous remote field sites, 3 individuals approached the helicopter bearing gear of their own. In an instant, reality and dreamspace collided in my mind as I was confronted with an amazingly distinct déjà vu. The spin of the rotor blades slowed as did the motion of these new individuals who had clearly rehearsed their exact motions to coincide with those I had encountered in another time but in this exact place. As quickly as the feeling blanketed my mind and emotions, the rotors and all motion accelerated to their previous pace and the bustling on the beach resumed. With all of the gear properly accounted for, the copter rose from its temporary roost with a resultant sandstorm in its immediate vicinity. As the scene quieted and the dust settled, introductions occurred between our party and the three beach people turned out to be Kiwis based at New Zealand’s tiny Cape Bird Hut just up the hill. As a further confirmation of my déjà vu, I realized I had already met one of the researchers, Kevin, on my first hike up Observation Hill shortly after my arrival in McMurdo and we proceeded to explain the purpose of our visit to the Cape.

P1000678The helicopter landing zone at Cape Bird is situated on a flat beach behind which rocky cliffs quickly rise towards an eventual meeting with the glacial arms of Mount Bird. A few hundred yards down the beach, a carefully crafted set of 60 stairs wind their way up the steep hillside to a bench where the Kiwi hut resides. Further up the hill another couple hundred of yards, a trail leads to the automatic weather station and the location of our ozone instrument installation. With 1400 pounds of lead batteries, solar panels, and metal framing, this was clearly going to be a challenging, physical day of work unlike our previous installs, but much to our delight, the Kiwis provided us with a wheelbarrow on the beach and another near the hut to aid in our laborious gear transport. And so we set about two hours of huffing our equipment up the steep flanks to the weather station just to reach the stage that we could actually begin to erect the station. In an ordinary place and situation, the work would have been mind numbing and regrettable, but this place was not ordinary, it was Cape Bird.

As an American, you might think this cape was named for our renowned Antarctic explorer, Admiral Richard Byrd, who among other aviation exploits was the first to fly over the South Pole. Instead, this northern tip of Ross Island was named a century before Byrd on an 1841 British expedition for Lieutenant Edward J. Bird of the ship Erebus. But if you were to step foot on this coast for your first time with no prior knowledge of its existence, you would likely choose the same name but for a completely unrelated reason. In fact, as our helicopter descended past the cliffs towards the beach, my vision began to fill with dozens of curious little animals who are neither fish nor mammals as you might guess, but are actually flightless birds. With over 100,000 Adélie penguins occupying a rookery along the Cape Bird beach, no matter the name’s origin, it certainly seems to have been chosen correctly.

1, 2, 3,... JUMP!!!

So you can begin to imagine why hauling hundreds of pounds of equipment up the hill was anything but a pyramid- building, slaving experience. For when we crested the hill at the weather station site, our vision was filled by the entire penguin colony, our ears were filled with their incessant squawking, and our noses were filled with the unavoidable byproducts of so many animals of the sea living in such close proximity. The setting was spectacular, but I was concerned that it was a fleeting moment that would vanish the instant we had time to spare, so I directed my full attention towards the landscape beyond our immediate work hoping to absorb as much as possible throughout the day. There are strict guidelines concerning animal interaction in Antarctica, so I quietly observed the penguins from a distance and captured photos from our high perch using my long zoom camera.

When our grunt work was nearing its conclusion, Kevin arrived at our site with a 70 pound battery in arms and an invitation to lunch and tea in the Kiwi hut, both of which we gratefully accepted. We learned about their field research over sandwiches, and then Kevin offered a most spectacular invitation to join him on a private, up-close tour of the penguin rookery after we finished our installation. Considering the distance that must usually be maintained from wildlife according to the Antarctic Treaty, his offer was a most incredible opportunity to experience this quintessential Antarctica. With this new goal in mind, the ozone station practically assembled itself over the next few hours, and before long, we found ourselves being guided along the beach in the midst of the massive Adélie penguin rookery.

In sharp contrast to the windy, cooler weather that we had been experiencing in McMurdo as of late, Cape Bird was graced with sunshine, blue skies, and almost no wind. The quiet air allowed ice flows to return close to shore and penguins took advantage of the newfound islands with plunges into the water followed shortly after with amazing leaps out of the sea and landings onto their feet on the ice. At least as amazing and in a behavior I never knew existed, the penguins swam through the water like porpoises with their bodies alternately diving and attaining momentary flight. As we worked our way along the beach, I found myself lagging farther and farther behind the others. The scene around me was all encompassing with mini dramas being enacted by groups of penguins everywhere I looked. But mostly, I was simply enamored by the antics of these bipedal, adorable little creatures who walked as if they were a very distant evolutionary relative of our human species and almost wholly unrelated to the bird family to which they actually belong. I wandered for some time along the water amongst this alien world occupied by a colony of odd, little inhabitants and an occasional, massive seal who blissfully rested without a trace of motion on the warm, black sand. As I neared the glacial terminus, the other party members had already turned around and begun their return to the hut. I rejoined them for a stroll through the middle of the colony, but quickly found myself lagging again as the dynamics of the local species fully occupied my attention. Eventually, we reached the edge of the rookery and ascended to the hut where the others sipped tea and engaged in conversation. Meanwhile, I was still focused on the occupants below us at the water’s edge and with a few minutes left before the helicopter’s arrival, I politely dismissed myself for some final time on the beach with the Adélies. The helicopter arrived 25 minutes late which afforded a little more precious time in this special place, and I cherished every bit of it. I knew that my Antarctic experience was going to be special, but my time spent at Cape Bird left me feeling truly blessed. Without a doubt, my time among the Adélie penguins was of the most incredible experiences of my life.

During the time I spent on the Cape Bird beach, I managed to amass 400 photos and did my best to select some favorites that you can view directly in the photo album below or in a new page.

I also captured a panorama of the ozone station and the hillside that overlooks the impressive Adélie penguin colony that you can view directly in the frame below.

I also captured a few random video clips of the Adélie penguins and decided to splice them together to provide a sense of how these peculiar little creatures spend their time.

Sunday, January 22, 2012

Half Way..

P1030562My anticipation for this moment had been building for 6 months, yet I found myself in a panic ridden state as the whine of the rotors increased in pitch directly over my head. The immense bulk of my Big Red parka and the Lilliputian dimensions of the cabin restricted my motions while the multiple legs of the seat belt hid themselves in the darkest nooks and crannies of the collapsible seats. Just minutes prior, we received detailed instructions on how to brace for impact and how to cut the fuel in case of a crash. But without a seat belt, there was no way I would survive an impact with the ground and without a helmet on my head, there was no means of communicating with the pilot who seemed intent on take off in the coming seconds. The rotors continued to whir faster and faster and I felt no closer to readying myself for the first Antarctic helicopter flight of our expedition. I clumsily fumbled as seconds seemed to stretch into minutes and eventually found myself securely attached to the aircraft with helmet fastened as the pilot queried the passengers for confirmation of takeoff readiness. Seconds later, the ground slowly fell away from the helicopter skids in a perception in which the helicopter remained motionless and the world moved around it. Slowly, we changed heading, banked, and pitched towards the sea ice and the sensation of motion set in. And so we were off to our first installation in a rush that was reminiscent of the previous weeks’ progress.

P1030500After a fast paced first week in McMurdo, we settled into a work rhythm that involved repeated construction and disassembly of the four ozone stations. We began our assembly practice on the UNAVCO power system which we had previously constructed twice back in Colorado, and therefore felt confident in its selection as the first system for deployment. On its third construction, we chose to deploy the system to the oh-so-far reaches of the Crary Lab parking lot to assist in field testing its components prior to final deployment to Marble Point. The system was outfitted with two 80 watt solar panels, two 5 watt vertical wind turbines, and a dozen sealed lead acid batteries on its aluminum tubing frame. Batteries, oh batteries. Although this research project is aimed at understanding ozone, you could easily be mistaken into believing that its purpose was simply to work with batteries. Among the required job criteria was the most important of all- Must be willing to carry and care for 70 pound batteries. The staggering array of batteries was large enough to power a suburban house, and each of these lead beasts had to be measured, charged, and carried countless times before the systems could even be considered ready for installation in the final sites. While the ozone instruments required careful engineering design and scientific insight, the remainder of the system was an exercise of manual labor which simply could not be escaped but fortunately required an expert in battery carrying and charging from someone just like me.

P1030507After attending to the endless battery charging and the completion of the UNAVCO power system, we progressed towards our first assembly of the Wisconsin power systems which were previously unknown to us. The Wisconsin systems were almost identical clones of the established UNAVCO versions and we quickly discovered that the alternate design proved no more challenging as we assembled three of the units over the course of the next two weeks. Days filled themselves with the construction of the power systems in the parking lot and then progressed to their disassembly into components that could fit within the tight confines of the helicopter cabin.
P1030583As an additional means of testing the ozone instrument, on Saturday, January 7th, we piled ourselves, our cold weather gear, and a test version of the instrument into a tracked vehicle called a Pisten Bully and headed out onto the ice shelf to deploy it in a remote location free of pollutants called Windless Bight. The Pisten Bully is a passenger carrying version of snow cats that groom ski hills and as such can trudge through any snow conditions but at a painfully slow pace. Two hours of rumbling and rattling over the snow later, we arrived at an instrument site on the ice that is configured to detect nuclear explosions anywhere on the globe, and within 30 minutes, the compact ozone instrument was securely mounted and collecting data. And true to form, the test unit proved its worth as its telemetry revealed an issue to Lars a week later back in the comfort of the Crary Lab. If the issue proved to be systematic, it would be important to understand it before all the systems were released to the wild, so on January 18th we set out on another 4 hour excursion in the Pisten Bully to the remote ice location. Fortune was on our side that day as the issue was determined to be fixable in software, and the day’s initially overcast weather gave way to reveal the towering Mount Erebus and Mount Terror high above us. Not only did we begin to accomplish our technical goals at Windless Bight, but much to my satisfaction, we also began to embark on our adventures to the ice.

P1030537Weeks of travel, hard work, and confined living conditions eventually took a toll on my body as it succumbed to the dreaded McMurdo Crud. During the first days of the cold, I suffered through sniffles and decreasing energy levels but eventually found myself bed ridden on my day off while others frolicked outside in the sunshine. While it pained me to spend my free time sleeping the day away, there was impending reward or punishment depending on how my body responded to the rest, since we were scheduled to fly to Marble Point the following day for our first real field installation. So after a full day of deliberate rest that allowed me to rally for the occasion, I found myself in that panicked state in the helicopter cabin on Monday, January 16 on my way to Marble Point. The cramped cabin was occupied by our team and another party of 3 and much to my chagrin, I was wedged tightly in the center of the craft where the views and photographic possibilities were extremely limited. Nonetheless, the half hour ride proceeded smoothly across the sea ice and then the helicopter pilot revealed the amazing capabilities of the craft as he glided effortlessly over acres of cliché Martian landscape in search of our desired installation site adjacent to the Wisconsin weather station. After a perfect touch down on a tent-site-sized landing spot, we efficiently gathered our personal belongings off to the side and awaited the arrival of a second helicopter that contained the power system equipment. In a scene reminiscent of the opening to TV’s M.A.S.H., we offloaded the equipment from the second copter while its rotor blades continued to spin over our heads. A few minutes later, we had collected all of our gear and the helicopter departed, leaving us alone on the Antarctic continent for the first time in a scene that we had rehearsed and anticipated so many times. After all of that preparation, the time had finally come to execute the plan.

Methodically, we set about building the frame and then found ourselves executing the one part of the plan we had not practiced already. On a continent known for extreme weather, the power system bears a striking resemblance to a ship with sail lofted, and the last thing we wanted was for the ozone system to be tumbling across the ice sheet like a sad, green port-a-potty on the side of I-80 in Wyoming. Two of the frame corners were near bedrock, so we drilled 1/2” diameter holes and inserted purpose-built rock bolts that provide ideal anchor points. The other two corners lacked bedrock, so we laboriously hammered 1-inch steel spikes a foot and a half into the ground and then attached the 4 corners of the frame to the anchors with chain. With that taken care of, we returned to our usual routine by adding solar panels, wind turbines, and the Hardigg cases to the frame. Then of course, we lugged 12 batteries and placed them in the Hardigg cases and began the careful procedure of electrically testing and connecting each component of the power system. In order to communicate the instrument data with the outside world, Lars connected the ozone station to an existing radio transmitter in the Wisconsin weather station and the instrument was finally powered on. Minutes later, it sprung to life with its familiar pump buzzing aloud just as it had done so many times in the lab before. The installation was complete after 5 hours with an hour to spare before the helicopter returned, so we casually explored the immediate area near the station where I was able to capture the panorama below.

The helicopter arrived on schedule, touched down in the same, miniscule landing zone, and we boarded with no more fan fare than hailing a New York taxi as the rotors whipped around over our heads. I was pleasantly surprised to find a more intuitive seat belt in this helicopter and was quickly fastened with none of the grief I experienced on the previous take off. The aircraft yawed and occasionally bucked in the wind as we cruised 600 feet above the sea ice, and my GPS confirmed the blustery conditions when I discovered that we were proceeding 30 mph slower than the 130 mph speed of the first leg. For the first time, I was able to enjoy the helicopter ride over the relatively featureless sea ice and my gaze out the window eventually discovered long, straight tracks that would eventually lead to seals near holes in the ice. Further inspection of the ground showed smaller tracks that I speculated were from penguins and with a few minutes remaining in the flight, I spotted 3 tiny penguins waddling their way along the ice. After a day spent in 16 mph, cool wind, I was ready to return home and the rapidly approaching view of McMurdo comforted me until the helicopter wildly swung to the left and to the right as if gripped by the wind itself. Fear began to set in, but I reminded myself that I was in the trusted hands of an experienced, professional pilot. No sooner had the turbulence started than he had the craft back under control for a safe landing. Half an hour later, we were back in the lab and Lars happily reported the first science data from the Marble Point ozone station!
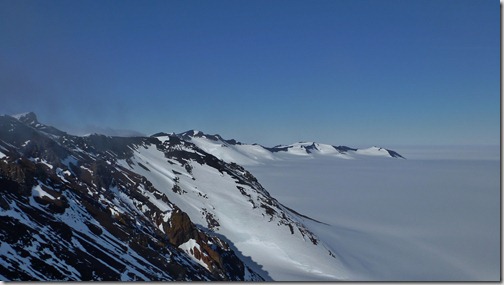
Minna Bluff and the Ross Ice ShelfEven with our first field installation under our belt, we weren’t resting on our laurels this past week as we disassembled the first Wisconsin frame for scheduled transport to the Minna Bluff site on Friday. But as often happens with flight schedules, Thursday’s foggy morning backed up flights and bumped our trip until Saturday, January 21. Only five days after our first install, I awoke feeling that I had finally recovered from the McMurdo Crud and readied myself for the day with a hearty, diner style breakfast consisting of sunnyside eggs, hashbrowns, and toast. And as we waited at the helicopter passenger terminal, I prepped myself by emptying Big Red of superfluous items that would interfere with the seat belt, then donned my helmet ahead of time, and only half jokingly went through the motions of putting on the 4 point seat belt. When the time came to board the chopper, I was ready and we effortlessly lifted off and floated across the dead-still sky towards our destination. The distant location of Minna Bluff necessitated a gorgeous flight path that toured us between White and Black islands and past Mount Discovery. Once again, the breathtaking views were difficult to capture on my camera from my interior seating location, but the experience of flight in such a majestic location was not lessened at all. The search for the actual weather station locations is a game that both pilots and passengers seem to truly enjoy as they buzz the ground and arc the machine in tight circles before finally lowering the skids softly to the rocks below.
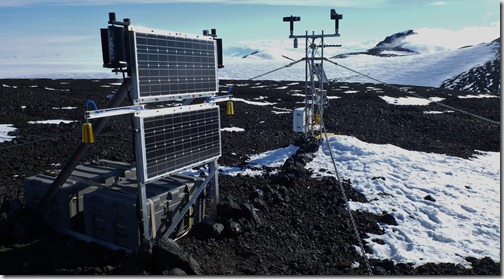
Completed ozone station (left) and the existing automatic weather station (right)As its name implies, Minna Bluff sits high above the sea ice on a coastline promontory akin to that of the British Isles that leaves it particularly susceptible to high winds that arrive unimpeded for thousands of miles along the continental ice. So whenever we discussed Minna Bluff, conversation turned to the gale force winds that we expected would complicate the installation effort. You can imagine our collective surprise when we disembarked the helicopter to find absolutely still air as reflected by the motionless anemometers on the weather station. Without a complaint, we quickly assembled the frame in the warm sunshine, and I even stripped down to a t-shirt during the aerobic spike-driving task. Our understanding of the power systems and each other became apparent as we efficiently divided tasks and made short work of the assembly. After 2 hours, the system was completely assembled mechanically, so we took a brief walk to the bluff’s edge where we enjoyed our lunch and views of endless white that eventually lead to the South Pole. Two hours later, the entire system was up and running and the wind had still not increased to more than a slight breeze. The fortunate conditions and early completion afforded us an opportunity to explore a little farther to another ridge point half a mile away where we took in the views and I shot the panorama below.

The efficient helicopter schedulers decided that our return flight could be combined with that of two more scientists up the coast, so after lift off, the helicopter followed an entirely new route along the termini of the famous Dry Valleys. With an empty helicopter, I was finally able to select a window seat and wisely chose the left side that provided views of my namesake Brown Peninsula and amazing glacial melt pools below. The other two passengers had spent the day surveying an area called Cape Chocolate, and the pea sized gravel bed provided no challenge for the pilot who easily set the craft down in the exact skid marks of his previous landing. In the air again and on our way back to McMurdo, I was amazed by the artistic, fractal patterns on the sea ice and happily took advantage of my excellent vantage point with nonstop shutter clicking of my camera that you can see in the photo slide show below or in a new window.

The warm, still air of the late day provided an effortless landing in McMurdo and minutes later in a tradition that will hopefully continue, Lars was able to report that he received science data from the Minna Bluff station and all was well! With our stay in Antarctica at exactly the half way point, it is encouraging to know that we have successfully completed half of the ozone station installations. We are certainly breathing a little easier, but there is more adventure so stay tuned…

Thursday, December 2, 2010

Costa Rica Kayak Adventure!

Tomorrow, I take off for a 10 day whitewater kayaking adventure through Costa Rica! The warm weather will be a welcome break from the cold winter that has begun to descend on Colorado, and it will feel great to get back in my kayak every day after a dry spell with almost no boating. Rain and flood conditions tend to dictate which rivers are navigable on any given day, so there is no set itinerary for our trip. However, I plan to check in with my SPOT GPS each day so you can follow along from your computer. I can't wait to get started!

12/3/10- 5:09am Barely got our kayaks onto the plane. "Continental Airlines will accept one pack containing a lightweight assembly kayak less than 50 lbs ". No size restrictions mentioned or any mention of hardshell vs. collapsible. We were second in line at 4am, but the agent said there was a luggage embargo for large items and that our kayaks didn't qualify as "kayak assembly". Not cool. Fortunately, I kept my cool and after 20 minutes, I was able to convince the supervisor to let the boats on the plane. Whew. Now I'm just hoping they make it to Costa Rica.

4:31pm Made it to San Jose and the Hotel Mi Tierra and sent my first SPOT update. Now I'm updating my blog from my iPhone over wifi in the hotel. Very cool use of technology! And just as importantly, our kayaks and gear all made it here successfully. Pura Vida!


12/4/10 7:00am The whole crew made it here and we are off to run the Sarapaqui and possibly a 30 foot waterfall! Bueno!


7:55pm Awesome day on the Lower Sarapaqui. Lyle was the only one to run the 30 ft waterfall, since he broke his paddle on the descent. The jungle setting and warm water were huge contrasts to my normal Colorado boating style and very cool. Exhausted.

12/5/10 8:41pm Another incredible day in the Sarapaqui. This time we did the Upper and Lower. I could really get used to boating every day down here. It doesn't get much better!

12/6/10 6:30pm Kayaked the Upper and Lower Pejibaye today. Very cool jungle setting with huge boulders and trees hanging over the river. Big 6' drop to start things out and then slow going to avoid strainers among the boulders. We all had a great time and are now staying in the beautiful Turrialtico lodge just outside of Turrialba. Tomorrow we begin an overnight on the Pacuare, so no internet but SPOT should hopefully work, and of course the kayaking and scenery will be incredible.


12/7/2010- 9am, Change of plans. It rained all night which resulted in the Pacaure swelling up to the red gauge. So rather than chance it, we are heading to the beach for a few days. Either way, it's hard to beat!

12/8/10 8:30am. Dawn patrol kayak surf session this morning at Playa Hermosa. Now off to kayak a river. Awesome!


6pm. Kayaked Upper and Lower Naranjo. Another cool run and even had a crocodile chase Lyle!
Now we are staying in Dominical beach town for a few days. The black sand beaches have amazing phosphorescent organisms that light up like stars when you kick sand in the dark- trippy!


12/9/10 6:30pm Just got out of my boat for the last time today. It's really amazing how much time I have spent in it this week! Today, we started kayaking in a tiny mountain creek that led into the clear waters of Rio Guabo that eventually led us into the Pacific Ocean. Source to sea- how incredible! Along the way, we had shelf drops, waterfalls, a poisonous snake, a crocodile, and then 6' breaking waves in the ocean. And then we surfed our way back along the beach to our hotel. After a short break, we were back in the ocean ripping up the waves in front of an amazing sunset! Finally, darkness got us out of our boats and back to the hotel for a shower and dinner. Man, what an incredible vacation!

12/10/10 6:30pm. Living the life in Costa Rica. In the ocean at 5am for 2 hours of kayak surfing as the sun rose, then kayaked the middle section of Rio General, then back in the ocean for the last hour and half of the day for more kayak surf as the sun set over the Pacific.

12/11/10 10pm. How many days can I report on another great day here in Costa Rica? Dunno, but today will be my last until my next visit :-( Today began with another dawn kayak surf session followed by banana pancakes and then kayaking the Rio Savagre. What an amazing trip!


Finally put together a photo slideshow and posted it to YouTube!


Friday, April 16, 2010

History Balloon Photos

High Altitude Balloon Flight for Boulder History Museum I would have to say that recovering the balloon package is my favorite part of launching high altitude balloons. The whole process reminds me a bit of playing neighborhood baseball as a child. Inevitably, the ball would get hit into another neighbors yard or get caught in a tree or someplace inaccessible, and then a small adventure would ensue as we went about trying to get it back. As we get older, our sense of scale and focus changes, and we find less and less wonder in our usual, immediate surroundings. But every time we launch one of these balloons, eastern Colorado suddenly becomes my childhood neighborhood as I set out to search for the camera package with my friends. And every time, it is an adventure.

High Altitude Balloon Flight for Boulder History Museum We do our best to select launch sites and wind conditions that will provide a safe trajectory away from heavily populated areas and airspace. And we label the camera package with our contact information and non-hazardous markings. But even with all that, things don’t always go to plan and we end up confronted with a situation like this!

It turned out that the balloon package landed in a horse corral and the shredded balloon covered the “Non” portion of the “Non-Hazardous” marking. Within 20 minutes of landing, two nice women noticed it and called the police due to the suspicious hazardous markings. Thanks to our trusty SPOT messenger, we made it there before Johnny-Law, and as Ricky Ricardo used to say, we had some esplainin’ to do. We happily shared the purpose of the mission and the joy that we witnessed when the balloon was launched in front of dozens of elementary and middle school children. We even dismantled the package to prove to the officer that we were on the up-and-up, which was sufficient for him to continue on his way. And we finally reviewed the photos with our new friends and promised that we would follow up with an email link to the photos.

HistoryAltSpeedA  closer examination of the GPS log showed that the balloon reached a new personal record of 109,000 feet above sea level! Be sure to check out the GPS track file with geotagged photos and the photo album of the best photos.

Wednesday, March 24, 2010

Lucky Balloon!

St Patrick's Day High Altitude BalloonIf you read the pre-flight article, you’d remember that I ended by saying, “Let's hope for the Luck o' the Irish for the ole' balloon!” As it turned out, this balloon flight definitely needed the luck of the Irish. After a perfect launch into a blue-bird Colorado sky, we casually began to follow the SPOT location updates from the balloon towards the expected southeast landing location. Things were going great, almost too great. We followed it to Kiowa, CO and surmised that it must have been descending based on the time aloft and SPOT update cadence after its high altitude blackout. An impromptu picnic ensued on a prairie hillside while we waited for another SPOT update, but it never came. After half an hour, we decided to continue driving and search for it roadside, but that only got us as far as the Sproch Cemetary for another wait and rest session. But there would be no more updates from the SPOT. It was a beautiful day and we were enjoying ourselves, but it was difficult to accept that the balloon was lost and we might never know why it fell off the radar. After verifying with SPOT tech support that there servers were still functioning, we did another slow road side search while driving back to the last known location. A local rancher allowed us on his land and we fanned out looking for a needle in a haystack, or in this case, a camera in a hayfield. It was amazing how many small objects appeared to be the balloon, its parachute, or the styrofoam package. And there was always one more hill just over yonder that might have hidden our treasure. It was like wandering the desert and coming upon mirage after mirage. We probably walked about half a mile before realizing the absurdity of our search and heading home.
Several days came and went along with spring snow which I realized would have ruined the poor camera as it sat out in the elements. What a sad fate for the tough little Canon SD800. Two trips to the edge of space and then a snowy demise.
St Patrick's Day High Altitude Balloon Even then, we all held hope that some day several months in the future, a farmer would stumble upon it, give us a call, and we would at least be able to recover the photos on the SD card. What I didn’t expect is that I would get that call on Monday, only five days after losing the package! Our luck had certainly changed for the better, and I immediately drove down to Castle Rock to retrieve the camera package!
St Patrick's Day High Altitude Balloon It turns out that the package landed less than a mile from the last SPOT update and that if we had kept searching in the same direction, we would have probably found it within 30 minutes! On Thursday evening (the day after the flight), a local rancher was out gathering her cows when she came upon it. She brought it inside that night where it sat warm and dry for the next several days as the wet snow blanketed the fields outside, and then she contacted us on Monday. I couldn’t have been more excited when I got the call about it! I literally jumped up and down in my office and hooted and hollered. I exclaimed that it was better than winning the lottery! It didn’t take long to reach Castle Rock where I offered my sincerest thanks to the rancher for her kindness and honesty in getting the package back to me.
speed_alt Once again, the photos from the edge of space were absolutely beautiful with expansive views of the snow capped Rocky Mountains and an amazing overflight of Denver. This payload included more sophisticated instrumentation including a dedicated GPS data logger and a separate Arduino-based logger of GPS information, heading angle, pressure, and ambient temperature. As expected, the EM406 GPS on the Arduino did not function at high altitudes, but the Sparkfun GPS logger kept on working and recorded a new altitude record for us of 106,000 feet above sea level!
Of course, we have lots of terrific photos in this Lucky Balloon photo album and an accompanying KMZ file to view the entire flight with geotagged photos in Google Earth.
St Patrick's Day High Altitude Balloon But the question still remained, why did the SPOT stop sending us position updates? Well, when we opened the package, its LEDs were still blinking in the correct mode, so we know that it was still powered on. We also know that the reentry speed was much higher than the first flight and a hard landing could have possibly caused a glitch. But most importantly (in my opinion), we know that it landed on its side in an open field with a clear view of the sky, and we know that SPOT recommends that it be operated with its antenna facing up and with at least 12 inches separation from any other GPS receivers. So it’s my belief that the combination of radio interference with the other electronics and the poor viewing angle to the sky caused us to sweat it out for five days until our guardian angel delivered the camera back to us. Hopefully, we learned our lesson and won’t need to rely on luck next time!

Tuesday, March 16, 2010

St Patrick's Day Balloon Launch

That's right, the balloon team is back at it again! This time, we are launching a balloon as part of an Education and Public Outreach (EPO) effort at LASP in conjunction with Arvada High School. The expected launch time is 9:30am MDT.

The payload has a few extra goodies this time based on the open-source Arduino microcontroller platform that should simplify data logging of GPS location, heading, pressure, and temperature. We will still be taking photos once per minute and tracking the real-time location using the SPOT satellite messenger.

I will be attempting to provide some real-time video streaming of the launch, chase, and recovery from my iPhone using a free service from USTREAM. Check out the embedded video below, or if you want to view it in a separate browser window go to this address.
Once again, check the map below for the balloon's location that will be updated every 10 minutes, or you can view the progress at the SPOT Shared Page or at the SPOT Trip Manager page.


Let's hope for the Luck o' the Irish for the ole' balloon!

Thursday, January 7, 2010

Edge of Space Follow-Up

The expanded analysis of the January 5 balloon flight to the edge of space is finally available! If you aren't a geek, you will be probably be satisfied with the YouTube documentary and photo albums that are presented below. But if you have been asking questions like, "How high did it go?", or "How come the camera didn't get too cold and stop working?", then you should keep reading after the fun multimedia shows.

 
If you enjoyed the movie and want to browse through the photos at your own pace, be sure to check out this annotated photo album.
 

Now it's time to get down to geek business...

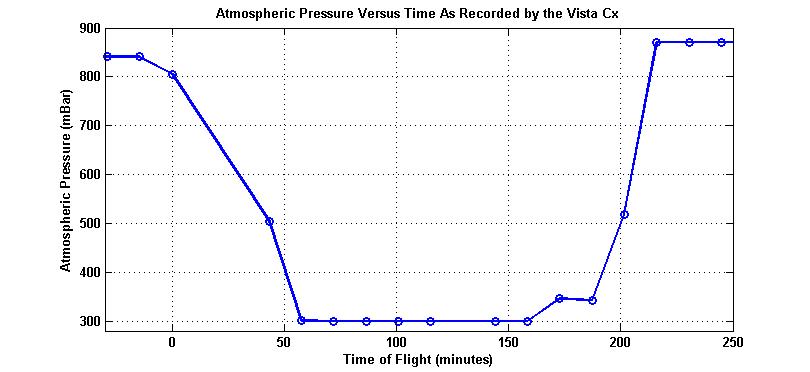
The number one question I have been asked has been, "How high did the balloon go?" In order to answer this question, we flew my Garmin Vista Cx that logged GPS location every 5 seconds and also logged barometric pressure/altitude. I configured the GPS to use the pressure in the altitude calculation, since I had heard rumors of consumer GPS not working at high altitudes. However, upon recovery we were disappointed to discover that the barometric pressure saturated at 300 mBar (30k feet) and the cadence was very slow (~15 mins/sample).
 
The saturated pressure resulted in a GPS profile that maxxed out at 30,000 feet. However, the rise rate up to that elevation and the descent rate had great fidelity, so there was hope at estimating the maximum altitude. Finally, the photos were taken at regular 1-minute intervals, and the images showed clearly when the balloon popped, since they began to tumble irregularly. So with a little engineering detective work, I was able to estimate the maximum altitude at 93,687 feet as seen in the plot below!
 
Another interesting lesson we learned regarding altitude was that the SPOT does not provide altitude in its location reports. Because of that, when we received updates near the predicting landing site at Limon, we assumed that it was on its way down. We spent several minutes looking up in the sky, only to learn much later that it was at its apex at that time!
 
Garmin MapSource software was used to determine the speed of the balloon throughout its trajectory based on the time-tagged GPS locations. The plot below shows that the speed was at its maximum when it was traveling in the jet stream. However, the maximum speed was not properly reflected, since the vertical component during free-fall was not part of the GPS data.
 
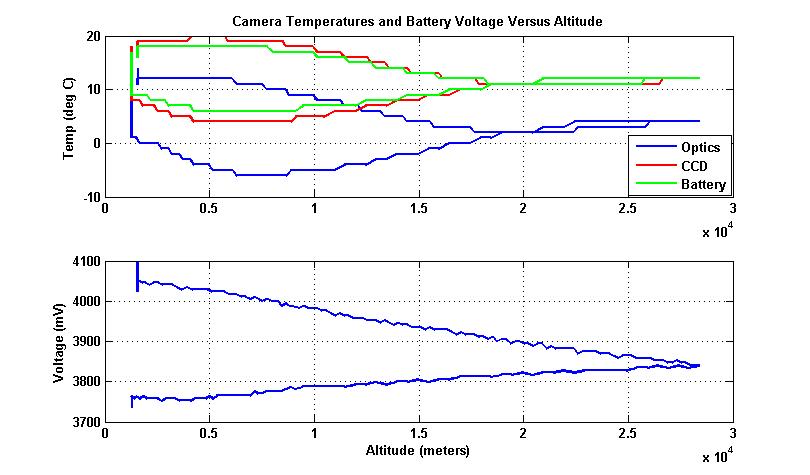
The other question that has been asked frequently has been, “How did the camera not freeze in the cold upper atmosphere?” First off, we packaged it in a styrofoam container that helped to maintain a warm environment, and secondly, Lars built a resistive heater using two 9volt batteries. But still, we didn’t know how things would turn out. However, Sam discovered that in CHDK, he could log temperatures in the camera, so that if it did stop working during the flight, we would know what conditions caused the problem. He was able to configure the SD800 to log the temperature of its optics, the CCD sensor, and the battery, as well as the battery voltage every minute when the photos were programmed to be taken. Additionally, he created a low-power mode (3.7volts) that would take photos less frequently. As previously said, the camera was still operating when we recovered it which was a testament to his programming and the camera itself! The plot below shows that the coldest portion of the camera was the optics housing, which wasn’t surprising, since it was exposed to the outside environment. We were pleasantly surprised to see that camera stayed relatively warm throughout the flight and that a heater may not even be needed if we need to save weight in the future. You can check out a plot of the temperature versus altitude here and try to explain to yourself the reason for the temperature at the apex of the flight.

All of this data is really fun, but questions kept coming up when looking at the photos. People would ask, “How high was it in this photo?”, or “How fast was it traveling in this photo?” Since I had the times of all the photos and time tagged data, I was able to correlate the two and ultimately insert the data into the description field of the IPTC header for each of the photos in this album.
 
balloon_GEFinally, with the newly predicted altitude, I was able to modify the GPX files and incorporate the predicted profile into Google Earth. That profile was then used with RoboGeo to geotag the annotated photos to create an interactive experience in Google Earth that provides a comparison between the predicted path, the measured path, the extrapolated path, and the SPOT update locations. And to top it off, satellite cloud imagery was overlaid in order to show correlations between the camera photos and the satellite photos! (SpaceBalloon140.jpg, 215, 225, 232 shows the blob cloud with the same perspective as the weather satellite photo overlay.)  You can get the KMZ file here.
 
Or if you don’t want to view the photos in Google Earth, you can always check out this Google map in Picasa with geotagged photos instead.

You would think I was done with this data-rich, multi-media interpretation of the balloon launch, but I also decided to publish a Blurb book with the best photos from the album. After all, this website is all about digital stories, right? Click on the link below to preview or order the book.
 
I hope you’ve enjoyed this experience. I know I have and I look forward to more balloon launches in the future!
 

Photo Album

Blurb Book

Youtube Documentary Video

Google Earth Track with Photos (KMZ file)

Tuesday, January 5, 2010

Mission Accomplished!


The balloon launched successfully at 9:36am and was recovered in perfect condition 154 miles southeast of the launch site at 1:55pm! The camera was still taking photos at one minute intervals over 4 hours after the intervelometer was started, and it grabbed this great photo of all of us checking out our baby!

I haven't begun to process all of the photos, GPS data, sensor data, and video files, but here is a slide show of all the photos that the camera captured.


Every aspect of the mission went perfectly to plan except that the balloon traveled significantly farther than expected. Check out this Google Earth image to see the discrepency. One theory is that the parachute was oversized which resulted in a slow descent and and correspondingly long lateral drift. According to the GPS, the balloon was moving for 3 hours and 42 minutes at an average speed of 41.5 miles per hour and maximum speed of 95.4 mph! If you want to take a closer look at the GPS data, you can view the comparison in Google Earth by opening this KMZ file.

Stay tuned for a video documentary, photos from the ground, and geotagged photos in Google Earth!

Monday, January 4, 2010

Going UP Tomorrow!

UPDATE! 9:36am- Up, up, and away!

Tomorrow morning at approximately 8am MST, a weather balloon with my modified Canon SD800is, my SPOT GPS transmitter, and my Garmin Vista Cx will voyage to the edge of space!

The idea belonged to my colleagues Sam and Lars, and was soon added to my list of resolutions. After realizing that it was a reasonably easy goal to accomplish, we set about gathering all the parts and preparing to launch the camera to 100,000 feet above the Earth. For comparison, jet airliners fly at 35k feet and at 100k feet the curvature of the Earth and the darkness of space become apparent. Our goal is to photograph this breathtaking sight and return our payload safely to earth using off-the-shelf components that we already have. The camera was modified using the Canon Hack Development Kit (CDHK) to take photos at regular time intervals. The GPS will record the 3D path of the balloon as it ascends through the atmosphere, into the fast moving jet stream, and finally above 99% of the atmosphere where it will expand to a point that its latex surface will rupture. The payload will rapidly descend through the upper atmosphere until the air density increases to the point that the attached parachute slows the descent to a safe speed to its landing location about 100 miles downwind from the launch site. And all the while, the SPOT will be relaying the position of the balloon to us in real-time!

So if you are interested in following along, just take a look at the map below and be sure to refresh every it 10 minutes or so. I can't guarantee the exact launch time, so keep checking our progress throughout the morning.

Monday, June 22, 2009

Middle Fork of the Salmon River Follow-Along

Check back at this post each day to see the progress we've made as we raft and kayak our way down the Middle Fork of the Salmon River!

We launch on Friday, 6/26, take out on Thursday, 7/2, and will then kayak for a few days near Jackson, WY before returning to Colorado.

Update 6/3/09: We are safely off the river after a fantastic week of boating! No more updates to the map from now on.

Monday, April 27, 2009

From Blizzard to Summer Bliss

The weekend began with yet another April blizzard along the Front Range, but ended with warm, sunny weather in the Utah desert!

I began Friday (4/17/09) by battling awful road conditions through Clear Creek Canyon and up I-70 and was treated to lack of heat in the van during the blizzard as my thermostat decided to flake out on me. (Oh well, another project for next weekend.) But hot or cold, I was lucky to make it through the rough conditions. Laurie, who had the Westwater Canyon permit, got delayed for hours and eventually stuck in Dumont, CO after I-70 was closed. Good thing I made it through there 2 hours earlier! A few hours later, I met up with Kim and Brad in Fruita, where we modified our trip plan slightly. Even though Laurie had most of the food and kitchen gear, we were able to purchase some food and forge on through Ruby-Horsethief canyons on our own. Or perhaps you were able to infer most of this by tracking my progress on the web? :-)

Saturday proved to be much warmer than Friday, with temperatures in the high 50's and sunny skies. The water was moving quickly and thanks to our boat rigging the night before, we arrived at the Black Rocks camp by mid-afternoon just in time for siesta on the beach! I followed my nap up with a hike to the rim above the river and was able to capture the settings below on film.

Sunday was even warmer and the hot desert sun quickly reminded me of newly acquired sun burn from the day before. We broke camp at a reasonable time and arrived at the Westwater Ranger station by 1pm, where Laurie and the rest of of our group was waiting for us. The rest of the day was a continuation of our mellow float and we camped at Upper Little-D with all the whitewater waiting for us the following day. A great dinner and great company around the campfire topped off the day.

Monday was a rush of rapids in succession that gave way to another warm, sunny float to the Cisco take-out. Best of all- no wind! Of course, I couldn't be satisfied with merely rowing my raft through the whitewater. No, I had to use my new waterproof camera to make a movie of the experience, and Raft-Cam was born!


Sure the camera angle could use a little work, but it is still pretty cool! And if that isn't enough action for you, check out the photo, GPS tracks, and Google Earth files below!


Photo album
GPS Track Log (GPX File)
Google Earth Track with Photos (KMZ File)

Thursday, April 23, 2009

Geotagging Photos using RoboGeo

Geotagging is basically the process of associating location with photographs and can be accomplished in many ways. I have developed a process using a commercial product called RoboGEO that not only geotags the photos, but also creates KMZ files that allow the photos and associated GPS data to be viewed in Google Earth. Here is the procedure I use...
  • Start RoboGEO
  • Select images to be geotagged by following Step #1 in the left pane. This should probably be the set of images that were considered the "best" images in the Digital Workflow, although you may want to select a subset of them. All of the photos that are to be tagged should have time tags that correspond to GPS track data, or else the application will not know where to place them.

  • Select the GPX file that was previously created in Creating a GPX Trip File as the location data for Step #2 in the left pane by selecting From a tracklog file. When you do this, RoboGEO will determine the location of all the photos by comparing their timestamps to those from the GPS tracklog and interpolating as necessary. The Latitude, Longitude, and Altitude will now appear in the Photos pane of the application. You can now save this project by choosing Save Project.

  • For Step #3 in the left pane, choose Export to Google Earth with the following settings:


  • The Title should be manually set to describe the project you are creating. This will be the top level description in Google Earth.

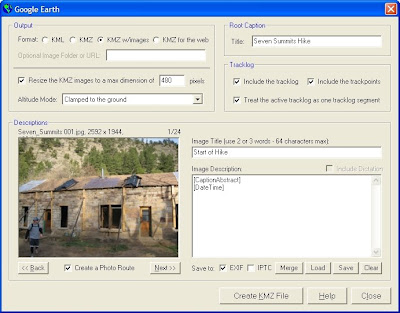
  • The Image Description is configured to automatically read the Description from the IPTC header that was added by PixVue and the EXIF timestamp that was added by the digitial camera at the time the photo was taken. Be sure to Save this information using the Save button to a file that I call GeoCaptionTemplate.txt. You will then be prompted to apply the same fields to the Image Description of all the photos which will save you some time, so do it. If you start a new project, you can then just Load the GeoCaptionTemplate.txt and apply it to all the Image Descriptions and you are off and running.


  • Manually enter short descriptions for the Image Tile and select Save to EXIF. This field is used to label the waypoints in the navigation pane of G.E., which will otherwise be labeled with the image name. Saving this to the EXIF header will prevent you from having to re-enter this information if the image is used in another RoboGeo project in the future while leaving the IPTC header information intact.

  • Select the Create KMZ File button which will automatically build the KMZ file and launch G.E.

  • Change the view in 3-D in Google Earth to create a favorable correspondence to each photo (correct heading, elevation, and position), then right-click on the corresponding waypoint in the Places pane, and select Snapshot View. I recommend that Elevation Exaggeration (under Tools->Options->3D View) be set to 1.0 to reduce possible viewing conflicts when other viewers open the file.

  • Now when you double-click on that waypoint in the Places pane, it will return you to the viewpoint that you just assigned. You will need to click once more to then display the photo in a pop-up window.

  • Add any additional waypoints from the GPX file that were not included automatically by RoboGeo. Open the appropriate GPX file that contains the waypoints, make them visible in the Places pane, and finally, drag them from the Waypoints section under GPS device to the Waypoints section for the KMZ file that is being edited.

  • Add any additional information to the top-level heading in the Places pane by right-clicking on it, selecting Properties, and adding text to the Description section. I typically add a short description of the file contents, a copyright notice, and a link to my website.

  • Save the KMZ file by right-clicking on the top-level heading in the Places pane, selecting Save Place As, and choosing the same file that you have been working on.

  • You are done! Now just make the file available to your friends and family!


Wednesday, April 22, 2009

Creating a GPX Trip File

Here is a nice procedure I have developed for concatenating several days worth of GPS waypoints and tracks into a single GPX file. The end result is a compact, neat file that hierarchically contains each day's track and waypoints with appropriate descriptions. This file can be easily shared and viewed intuitively in most mapping programs, including Google Earth.
This procedure is written based on the procedure I used to record data to my Garmin eTrex Vista Cx as described in this previous post.
  1. Extract waypoints from the GPS using Garmin Mapsource. Delete all non-relevant waypoints from list view and save remaining waypoints to ProjectWaypoints.gpx.

  2. Copy all GPX track files from GPS expansion memory card to PC. (One for each day of the trip.)

  3. Open up ProjectWaypoints.gpx in firstobject XML editor and save as Project.gpx.

  4. Open up the first day's GPX track file in another instance of firstobject XML editor.

  5. Merge or delete separate tracks from the first day to create a single track for the day. Mapsource is useful for identifying and deleting extraneous points. firstobject XML editor or Notepad can be used to manually merge two track segments (XML tag = ).

  6. Copy the track from the first day and paste into Project.gpx at the same level as the waypoints. In order for the Copy/Cut/Paste functions to be available, you will need to double-click the item you are copying or where you are pasting. This will highlight a chunk of the GPX file, and you will then know that you have copied or can paste.

  7. Repeat the process for each day of tracks.

  8. Edit the name for each waypoint and track in Project.gpx. (The tree view can show the name of each waypoint in firstobject XML editor if the following lines are added to the Tree Customization box under Tools->Preferences: trk name and wpt name.)

  9. The GPX file can now be opened in other applications (Google Earth, Mapsource, etc) and will show all the relevant geographical data for the trip while allowing individual tracks for waypoints to be toggled ON or OFF. If viewing in Google Earth, be sure that View->Show Time is set to Never, or G.E. will only show the track for the currently selected time frame.