I would have to say that recovering the balloon package is my favorite part of launching high altitude balloons. The whole process reminds me a bit of playing neighborhood baseball as a child. Inevitably, the ball would get hit into another neighbors yard or get caught in a tree or someplace inaccessible, and then a small adventure would ensue as we went about trying to get it back. As we get older, our sense of scale and focus changes, and we find less and less wonder in our usual, immediate surroundings. But every time we launch one of these balloons, eastern Colorado suddenly becomes my childhood neighborhood as I set out to search for the camera package with my friends. And every time, it is an adventure.
We do our best to select launch sites and wind conditions that will provide a safe trajectory away from heavily populated areas and airspace. And we label the camera package with our contact information and non-hazardous markings. But even with all that, things don’t always go to plan and we end up confronted with a situation like this!
It turned out that the balloon package landed in a horse corral and the shredded balloon covered the “Non” portion of the “Non-Hazardous” marking. Within 20 minutes of landing, two nice women noticed it and called the police due to the suspicious hazardous markings. Thanks to our trusty SPOT messenger, we made it there before Johnny-Law, and as Ricky Ricardo used to say, we had some esplainin’ to do. We happily shared the purpose of the mission and the joy that we witnessed when the balloon was launched in front of dozens of elementary and middle school children. We even dismantled the package to prove to the officer that we were on the up-and-up, which was sufficient for him to continue on his way. And we finally reviewed the photos with our new friends and promised that we would follow up with an email link to the photos.
This morning will mark the third flight of the camera/SPOT balloon package to the edge of space in 2010. The flight is another education and public outreach (EPO) opportunity that is taking place in conjunction with the Boulder History Museum. They are working with a local middle school to film and produce a short documentary about scientists in Boulder and Lars and the atmospheric scientists at LASP fit the bill. Or maybe they just wanted some cool pictures of the edge of space. Anyway, below is the map that will update automatically with the balloon’s location after its 9am MDT launch. Enjoy!
My interest in flying a tethered balloon with a camera system started back in July of 2006. Since then, I designed and built a sophisticated camera system, purchased a 7 foot diameter helium balloon, and have talked about flying it over Boulder to take aerial photographs. Almost 4 years have passed with enough yak shaving and procrastination for me to vow to finally do this on not one, but two New Year’s resolutions. I can finally and proudly say that I flew the balloon and the camera system over my South Boulder neighborhood and it was a tremendous success!
My initial interest in the subject goes way back to my Master’s Thesis that involved the design of a micro air vehicle control system for DARPA. The justification for the thesis work was that there is a strong need within the military (and other agencies) for visual knowledge of an environment that is best provided by an unmanned aerial vehicle (UAV). However, UAVs can be difficult to operate, so much research has been invested in developing autonomous UAVs that can operate on their own, which is exactly how I was funded for my research project.
Flash forward to 2006. I no longer live in Boston, but I am still working in the aerospace industry. Instead of designing control systems to fly aerial vehicles, I am designing control systems to point scientific payloads on satellites in earth orbit. I pick up my first issue of Make magazine while visiting my parents and am immediately blown away by the advancements in low-cost, robotic-like electronics that are available to the average hobbyist that used to be top-shelf military grade components. I subscribe to the magazine and request all back issues, which included their premiere issue focused on kite aerial photography. I have an epiphany. Kites can fly above the earth in a relatively fixed location and orientation without any sophisticate control system, which allows people to focus on building camera payloads to take incredible photographs. I am convinced that I have short-circuited all of the work that has gone into UAV control system development. I realize that there isn’t always wind to fly a kite. Duh. I think back to my childhood and remember helium balloons. I am a kid again and having fun with a balloon. It is the answer. I am convinced that the answer is to fly a helium balloon with a camera instead of investing precious time and money on developing sophisticated autonomous UAVs. I research the market and learn that three companies visibly cater to this type of market: Southern Balloon Works, SkyDoc Balloons, and Allsopp Helikites. All of these companies do impressive work and had my epiphany long ago. But they don’t design precision pointing systems for NASA, I do. I convince myself that I can buy a balloon from one of these vendors, build a sophisticated camera payload, and point it better and for cheaper than anyone else using low-cost hobby electronics.
We are now in July 2006. I spend some of my free time furthering research on the topic, ordering a balloon from Southern Balloon Works, buying a Canons S3is camera, buying and learning to work a BasicStamp-based Parallax BoeBot, buying a camera cradle from ServoCity, and ultimately building a pretty nice semi-autonomous gimbaled camera system to fly on the balloon. Of course, there were issues or I wouldn’t be writing this in 2010. The real-time video downlink from the camera had numerous issues. I eventually worked out the kinks between the RC transmitter and the video downlink and wound up with a reliable RC/video system. I also got involved in mentoring a FIRST robotics team which was a valuable experience, but that also ate into my free time for such extracurricular nerdy activities. Ultimately, it came down to priorities and focus. There are a few things I can say with complete conviction and one is that when we make something in our life a priority or if it occupies our focus, it will be done well and it will be done quickly. So although you could say that requirements creep caused me to try to make the system too autonomous or I got caught shaving a yak, when it comes down to it, flying a helium balloon just wasn’t a priority and didn’t occupy my focus for the past two years despite the fact that I really wished it would.
Sometimes, things in life don’t go as planned and we have to accept them for what they are, decide to fight against them, or a little of both. When it came to this balloon project, I would like to think that I went with a little of both. First, I was fortuitous to become friends with Sam and Lars, who have helped me tremendously in literally getting this project off the ground. Second, I made the conscious choice to abandon the lost cause of a BasicStamp controlled “smart” camera system and to pursue a remote controlled camera system that was well within my means. What was amazing was that after making that choice, it only took three weeks to make the adjustments to the system, get my friends onboard with the project, and ultimately fly my gimbaled balloon camera system. You can probably begin to understand now why I am proud of this accomplishment.
Instead of explaining the as-built system in writing, I thought it would be easier to watch it in action. So check out the overview video below.
And now onto the premiere flight of my tethered balloon camera system.
As you can see from the video, I think the first flight of this system went very well. The as-built system functioned as I had hoped, but the balloon proved to be much less stable than I expected. In some ways, that actually makes things more fun, since it provides me with a justification to improve upon the system :-) It may not be the game changing invention that I dreamed of years ago, but I am glad that I dreamed and proud that I had the courage to try to make it come true.
Be sure to check out the photo album to get a sense of the quality of the photos. There are some fun ones in there! The photo below highlights the improved resolution that near earth aerial photography can provide compared to satellite imagery. Also, if you want to see this photo and two others in Google Earth, down the this KMZ file.
What to do on a windy April day in Colorado? How about flying a kite high above an office building with a camera dangling precariously on the kite line in a poor man's attempt to take some cool photos? That's exactly what Lars and I did yesterday in my first foray into Kite Aerial Photography (KAP).
I first read about this in the premiere issue of Make Magazine several years ago. With my interest piqued about aerial photography, I began a slow quest that has led me to build a tethered balloon photography rig (still hasn't flown though) and to launch a camera to the edge of space twice so far this year. On the eve of this year, I mentioned the possibility of getting into KAP, so with the windy weather and a CHDK enabled camera, it only seemed natural to give it a go yesterday.
The winds were at least 15-20mph with gusts much higher, so it seemed likely that my kite could lift the weight of the camera. I had never attached any mass to a kite line before, so the first experiment involved wrapping the taught kite line around a carabiner and clipping a wrench to it. The wrench was easily hoisted into the air as it swayed all over the place in the gusty air. Two minutes later and the wrist tether of the camera was clipped to the carabiner and it was up in the air wildly taking photos! Unfortunately, the battery ran out and it was only programmed to take photos once per minute, so back into the lab for battery charging and reprogramming. An hour later, the camera was back up in the air taking photos once every 10 seconds! I quickly walked the line down, reviewed the photos to make sure it was all working, and back up it went on its completely unstable tether to a height at least 200 feet above the ground!
Considering how little effort (and thought) went into this little aerial photography experiment, I would say it went extremely well. We actually got quite a few nice photos, the best of which is an extremely crisp photo of our neighbor CASA with the Flatirons in the background.
Of course, I couldn't leave it at that, so last night I set about building a Picavet suspension to hold the camera level to the ground for the next time we have some nice windy conditions here in Boulder...
On another quick note, this trusty soldier of a camera is going to fly to the edge of space yet again this Friday as part of a documentary being produced by the Boulder History Museum. Let's hope for its safe return!
If you read the pre-flight article, you’d remember that I ended by saying, “Let's hope for the Luck o' the Irish for the ole' balloon!” As it turned out, this balloon flight definitely needed the luck of the Irish. After a perfect launch into a blue-bird Colorado sky, we casually began to follow the SPOT location updates from the balloon towards the expected southeast landing location. Things were going great, almost too great. We followed it to Kiowa, CO and surmised that it must have been descending based on the time aloft and SPOT update cadence after its high altitude blackout. An impromptu picnic ensued on a prairie hillside while we waited for another SPOT update, but it never came. After half an hour, we decided to continue driving and search for it roadside, but that only got us as far as the Sproch Cemetary for another wait and rest session. But there would be no more updates from the SPOT. It was a beautiful day and we were enjoying ourselves, but it was difficult to accept that the balloon was lost and we might never know why it fell off the radar. After verifying with SPOT tech support that there servers were still functioning, we did another slow road side search while driving back to the last known location. A local rancher allowed us on his land and we fanned out looking for a needle in a haystack, or in this case, a camera in a hayfield. It was amazing how many small objects appeared to be the balloon, its parachute, or the styrofoam package. And there was always one more hill just over yonder that might have hidden our treasure. It was like wandering the desert and coming upon mirage after mirage. We probably walked about half a mile before realizing the absurdity of our search and heading home.
Several days came and went along with spring snow which I realized would have ruined the poor camera as it sat out in the elements. What a sad fate for the tough little Canon SD800. Two trips to the edge of space and then a snowy demise. Even then, we all held hope that some day several months in the future, a farmer would stumble upon it, give us a call, and we would at least be able to recover the photos on the SD card. What I didn’t expect is that I would get that call on Monday, only five days after losing the package! Our luck had certainly changed for the better, and I immediately drove down to Castle Rock to retrieve the camera package! It turns out that the package landed less than a mile from the last SPOT update and that if we had kept searching in the same direction, we would have probably found it within 30 minutes! On Thursday evening (the day after the flight), a local rancher was out gathering her cows when she came upon it. She brought it inside that night where it sat warm and dry for the next several days as the wet snow blanketed the fields outside, and then she contacted us on Monday. I couldn’t have been more excited when I got the call about it! I literally jumped up and down in my office and hooted and hollered. I exclaimed that it was better than winning the lottery! It didn’t take long to reach Castle Rock where I offered my sincerest thanks to the rancher for her kindness and honesty in getting the package back to me. Once again, the photos from the edge of space were absolutely beautiful with expansive views of the snow capped Rocky Mountains and an amazing overflight of Denver. This payload included more sophisticated instrumentation including a dedicated GPS data logger and a separate Arduino-based logger of GPS information, heading angle, pressure, and ambient temperature. As expected, the EM406 GPS on the Arduino did not function at high altitudes, but the Sparkfun GPS logger kept on working and recorded a new altitude record for us of 106,000 feet above sea level!
Of course, we have lots of terrific photos in this Lucky Balloon photo album and an accompanying KMZ file to view the entire flight with geotagged photos in Google Earth. But the question still remained, why did the SPOT stop sending us position updates? Well, when we opened the package, its LEDs were still blinking in the correct mode, so we know that it was still powered on. We also know that the reentry speed was much higher than the first flight and a hard landing could have possibly caused a glitch. But most importantly (in my opinion), we know that it landed on its side in an open field with a clear view of the sky, and we know that SPOT recommends that it be operated with its antenna facing up and with at least 12 inches separation from any other GPS receivers. So it’s my belief that the combination of radio interference with the other electronics and the poor viewing angle to the sky caused us to sweat it out for five days until our guardian angel delivered the camera back to us. Hopefully, we learned our lesson and won’t need to rely on luck next time!
That's right, the balloon team is back at it again! This time, we are launching a balloon as part of an Education and Public Outreach (EPO) effort at LASP in conjunction with Arvada High School. The expected launch time is 9:30am MDT.
The payload has a few extra goodies this time based on the open-source Arduino microcontroller platform that should simplify data logging of GPS location, heading, pressure, and temperature. We will still be taking photos once per minute and tracking the real-time location using the SPOT satellite messenger.
I will be attempting to provide some real-time video streaming of the launch, chase, and recovery from my iPhone using a free service from USTREAM. Check out the embedded video below, or if you want to view it in a separate browser window go to this address.
Once again, check the map below for the balloon's location that will be updated every 10 minutes, or you can view the progress at the SPOT Shared Page or at the SPOT Trip Manager page.
Let's hope for the Luck o' the Irish for the ole' balloon!
The expanded analysis of the January 5 balloon flight to the edge of space is finally available! If you aren't a geek, you will be probably be satisfied with the YouTube documentary and photo albums that are presented below. But if you have been asking questions like, "How high did it go?", or "How come the camera didn't get too cold and stop working?", then you should keep reading after the fun multimedia shows.
If you enjoyed the movie and want to browse through the photos at your own pace, be sure to check out this annotated photo album.
Now it's time to get down to geek business...
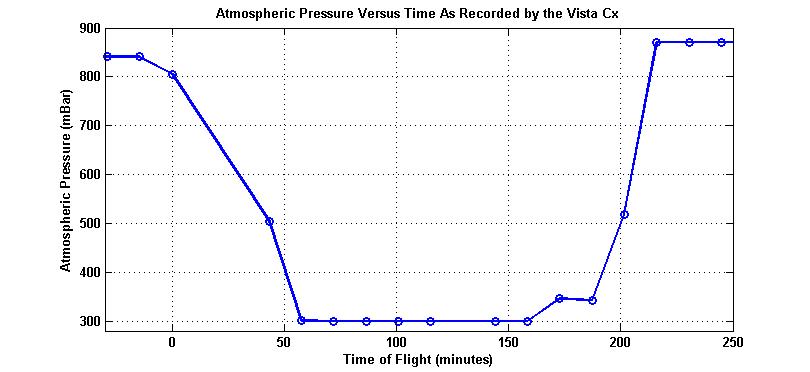
The number one question I have been asked has been, "How high did the balloon go?" In order to answer this question, we flew my Garmin Vista Cx that logged GPS location every 5 seconds and also logged barometric pressure/altitude. I configured the GPS to use the pressure in the altitude calculation, since I had heard rumors of consumer GPS not working at high altitudes. However, upon recovery we were disappointed to discover that the barometric pressure saturated at 300 mBar (30k feet) and the cadence was very slow (~15 mins/sample).
The saturated pressure resulted in a GPS profile that maxxed out at 30,000 feet. However, the rise rate up to that elevation and the descent rate had great fidelity, so there was hope at estimating the maximum altitude. Finally, the photos were taken at regular 1-minute intervals, and the images showed clearly when the balloon popped, since they began to tumble irregularly. So with a little engineering detective work, I was able to estimate the maximum altitude at 93,687 feet as seen in the plot below!
Another interesting lesson we learned regarding altitude was that the SPOT does not provide altitude in its location reports. Because of that, when we received updates near the predicting landing site at Limon, we assumed that it was on its way down. We spent several minutes looking up in the sky, only to learn much later that it was at its apex at that time!
Garmin MapSource software was used to determine the speed of the balloon throughout its trajectory based on the time-tagged GPS locations. The plot below shows that the speed was at its maximum when it was traveling in the jet stream. However, the maximum speed was not properly reflected, since the vertical component during free-fall was not part of the GPS data.
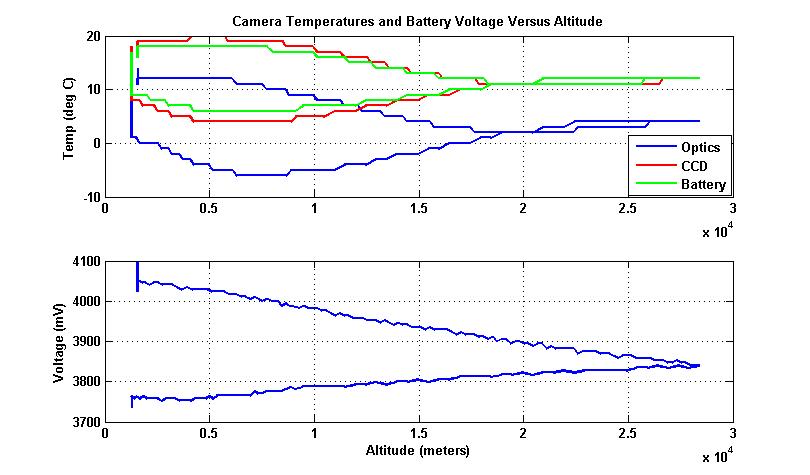
The other question that has been asked frequently has been, “How did the camera not freeze in the cold upper atmosphere?” First off, we packaged it in a styrofoam container that helped to maintain a warm environment, and secondly, Lars built a resistive heater using two 9volt batteries. But still, we didn’t know how things would turn out. However, Sam discovered that in CHDK, he could log temperatures in the camera, so that if it did stop working during the flight, we would know what conditions caused the problem. He was able to configure the SD800 to log the temperature of its optics, the CCD sensor, and the battery, as well as the battery voltage every minute when the photos were programmed to be taken. Additionally, he created a low-power mode (3.7volts) that would take photos less frequently. As previously said, the camera was still operating when we recovered it which was a testament to his programming and the camera itself! The plot below shows that the coldest portion of the camera was the optics housing, which wasn’t surprising, since it was exposed to the outside environment. We were pleasantly surprised to see that camera stayed relatively warm throughout the flight and that a heater may not even be needed if we need to save weight in the future. You can check out a plot of the temperature versus altitude here and try to explain to yourself the reason for the temperature at the apex of the flight.
All of this data is really fun, but questions kept coming up when looking at the photos. People would ask, “How high was it in this photo?”, or “How fast was it traveling in this photo?” Since I had the times of all the photos and time tagged data, I was able to correlate the two and ultimately insert the data into the description field of the IPTC header for each of the photos in this album.
Finally, with the newly predicted altitude, I was able to modify the GPX files and incorporate the predicted profile into Google Earth. That profile was then used with RoboGeo to geotag the annotated photos to create an interactive experience in Google Earth that provides a comparison between the predicted path, the measured path, the extrapolated path, and the SPOT update locations. And to top it off, satellite cloud imagery was overlaid in order to show correlations between the camera photos and the satellite photos! (SpaceBalloon140.jpg, 215, 225, 232 shows the blob cloud with the same perspective as the weather satellite photo overlay.) You can get the KMZ file here.
You would think I was done with this data-rich, multi-media interpretation of the balloon launch, but I also decided to publish a Blurb book with the best photos from the album. After all, this website is all about digital stories, right? Click on the link below to preview or order the book.
The balloon launched successfully at 9:36am and was recovered in perfect condition 154 miles southeast of the launch site at 1:55pm! The camera was still taking photos at one minute intervals over 4 hours after the intervelometer was started, and it grabbed this great photo of all of us checking out our baby!
Every aspect of the mission went perfectly to plan except that the balloon traveled significantly farther than expected. Check out this Google Earth image to see the discrepency. One theory is that the parachute was oversized which resulted in a slow descent and and correspondingly long lateral drift. According to the GPS, the balloon was moving for 3 hours and 42 minutes at an average speed of 41.5 miles per hour and maximum speed of 95.4 mph! If you want to take a closer look at the GPS data, you can view the comparison in Google Earth by opening this KMZ file.
Stay tuned for a video documentary, photos from the ground, and geotagged photos in Google Earth!
Tomorrow morning at approximately 8am MST, a weather balloon with my modified Canon SD800is, my SPOT GPS transmitter, and my Garmin Vista Cx will voyage to the edge of space!
The idea belonged to my colleagues Sam and Lars, and was soon added to my list of resolutions. After realizing that it was a reasonably easy goal to accomplish, we set about gathering all the parts and preparing to launch the camera to 100,000 feet above the Earth. For comparison, jet airliners fly at 35k feet and at 100k feet the curvature of the Earth and the darkness of space become apparent. Our goal is to photograph this breathtaking sight and return our payload safely to earth using off-the-shelf components that we already have. The camera was modified using the Canon Hack Development Kit (CDHK) to take photos at regular time intervals. The GPS will record the 3D path of the balloon as it ascends through the atmosphere, into the fast moving jet stream, and finally above 99% of the atmosphere where it will expand to a point that its latex surface will rupture. The payload will rapidly descend through the upper atmosphere until the air density increases to the point that the attached parachute slows the descent to a safe speed to its landing location about 100 miles downwind from the launch site. And all the while, the SPOT will be relaying the position of the balloon to us in real-time!
So if you are interested in following along, just take a look at the map below and be sure to refresh every it 10 minutes or so. I can't guarantee the exact launch time, so keep checking our progress throughout the morning.
After a summer-long hiatus from the piano, I returned to lessons with the intent to play Coldplay’s Lovers In Japan, but based on my teacher’s recommendations, settled for Lost! instead. Having never been through music lessons as a child, I never knew the fear associated with a piano recital, and it didn’t take me long to freeze up in front of a bunch of parents and little kids while playing the Beatles’ Ob-La-Di at my first recital and vow to play much better at my next recital. Three weeks of learning and practicing Lost! paid off at the Christmas recital when I played smoothly through the song despite my paralyzing fear. As proof that I actually learned to play the piano, I recorded myself earlier today!
I suppose you are wondering if I will follow up with more resolutions after last year’s successes. I have thought about new things to accomplish, but the only unique idea I have had is to learn to wrestle alligators! So instead of doing silly things just for the sake of doing something new, I’m going to keep working on these existing goals. I have been having a great time learning piano, so I plan to continue lessons and learning new songs in the year to come. My van is working great and I expect that I will continue to restore it to better-than-new condition. Last September, I got certified as an American Canoe Association (governing board of kayaking) instructor, so next year I will be sharing my knowledge and passion for kayaking as I instruct others through the Colorado Whitewater association. And lastly, I will take a photo from my helium filled balloon!
Labor Day weekend in Gunny Gorge. What could be better? I’ll tell you what, not a whole lot.
I have to thank Scott for conceiving of and organizing this really cool self-support, overnight kayak trip through Gunny Gorge. In addition to those responsibilities, he also carried all of the group gear and food in his monstrous, 12’ long Dagger Crossover so that we could have a luxurious time in camp!
Although I had done this run about 4 years ago, my only memories were of rain, cold water, shivering, and not being able to wait to get the trip over with. This year’s trip was in stark contrast to that, with beautiful, warm weather spread out over two days, stunning scenery, and lots of playful whitewater. Spending a night on the river slowed down the pace of the trip so that we could soak it all in at a pace that was truly fitting for Labor Day! After such a great experience, I would have to rate Gunny Gorge as one of my all-time river running favorites that I’m sure to do time and time again!
If you want to know if you enjoy where you live and can really call it home, spend 17 days and 4500 miles driving across the country and back. If, like me, you are utterly relieved and simultaneously overly joyful when you cross your state line again, then chances are that you like where you live and can call it home!
Take a look at the circuitous route I took across the country to the Ottawa, down through the Northeast, and finally back westward to Colorado! If you click on the map, it will take you to the full, interactive Google map with all the places I stopped along the way.
I specifically chose a different route home so I could see the Gateway Arch in person. A PBS documentary piqued my interest a few years ago, and I told myself that I would make a priority to see it the next time an opportunity presented itself. My evening arrival in St Louis presented the scene with great light, which I used to my advantage as I photographed bunches of perspective shots of this unique American monument that are posted in this photo album. I highly recommend a stop at the arch the next time you are in the neighborhood and be sure to ride the tram/elevator to the top!
One of the best aspects of my trip to the Ottawa River in my van was that it afforded me the opportunity to pop on down to the Jersey Shore afterwards to hang out with my family. After a too-quick Saturday night stop in New York to see Mom and Dad, I made it to Cape May, NJ for one of the annual Brown-Foertsch family vacations that I have never been able to attend. And this was a particularly good year to be in attendance, since it gave me a chance to meet the newest members of our family, Isabelle and Andrew!
It was a wonderful, relaxing week on the shore that was spent hanging out with brothers, sisters, in-laws, nieces, and nephews. I captured a few fun photos of our time on the beach, body surfing, and the dog-cousins playing. I have some great memories of our time there and can’t wait to see everyone again at Christmas!
The weather was cold and the nights were long back in late December when I decided to attend EJ’s kayaking class on the Ottawa River. My decision morphed with other goals and New Year’s resolutions to the end result of having kayaked 50 days (including the Numbers), having bombproofed my roll, and having radically modified my Westfalia by the time I completed the long drive to the Ottawa in late July. You could almost say that the very act of choosing and committing myself to this challenging class was the watershed moment that had the greatest impact on my kayaking. But as I like to say, it is one thing to talk about something and another to commit yourself and actually follow through.
Three other students (Olly, Neval, and Scott) and I were paired with the king of kayaking, EJ, and the prince, his son, Dane for five intensive days of instruction and playing on the river and an equal amount of goofing off and story telling off the river. When the week was over, we were all sad to part our separate ways, but our bodies were grateful for the respite.
The Ottawa is a very interesting river that is in great contrast to the rocky mountain rivers of Colorado that I am so used to. It is located in a very flat section of Canada a few hours north of Toronto and drains an extremely large area that corresponds to an equally large flow. For all intense purposes there should not be any rapids, but several geologic faults in the underlying granite bedrock cause large step changes in the river profile that results in the ultimate pool-drop rapid situation with big water! The whitewater sections of the river are dispersed over several miles with large lakes (pools) between each of the main rapids (drops). And within the stretch of water, the river splits into two primary channels- the Main Channel and the Middle Channel.
We spent every day except Wednesday on the Middle Channel, since it had a larger number of features in which to play and practice our skills. The gauge height of the river was 6’ on Monday and was certainly much bigger flow than anything I had was used to boating. It just so happened that our class occurred on the perfect week, since the previous month of rainy weather resulted in uncharacteristically high flows for that time of summer but with the added benefit of sunny weather. The flow was not only high on Monday at 6’, but it actually doubled in gauge height while we were there!
Both channels began with the first drop down McCoy’s rapid. Sattler’s Hole blocked the left portion of the river and just down stream, Phil’s Hole blocked the right portion. Fortunately, there is a multitude of ways to navigate these large obstructions, many of which involved finding a small seam right through the gut of the holes or just plain going into the holes and getting spit out eventually. Each day, EJ had us run a different line, so by the end of the week, we had learned to make it through the rapid no matter the situation. Personally, I had a few issues with the holes, since my skirt imploded on not one, but two occasions while getting window-shaded in them! The first time, I eventually exited my boat after about 5 rolls with a boat full of water, so when it happened again, I committed myself to paddling through the remainder of the rapid with just head, shoulders, and paddle above the water!
The next major feature that we encountered on the Middle Channel was the scenic Little Trickle, which was comfortingly reminiscent of Colorado boating. Once again, we ran many different lines down the rapid, each of which I thoroughly enjoyed, but with the boof move at high water being my favorite. Following that were two smooth, fun surf waves- Angel’s Kiss and Butterfly, which served up great playboating opportunities at every water level.
And then came Garvin’s Chute- a 15’ river wide waterfall with several navigable routes and many places that you don’t ever want to find yourself. Approaching it always got my heart racing as primal fear overtook my body. On Monday, the scout left me initially awestruck at the power and beauty of Dragon’s Tongue that coursed right down the center of the drop. But after watching Neval heroically run it without incident, I vowed that I would perform the feat the next day. And that I did! Despite the fear that cloaked my whole person, I followed Dane right down the smooth tongue while focusing on my target at the end of the tongue and not the side drop offs into living hell. I dropped off the bottom, experienced a surprisingly hard impact in the white, aerated water, and emerged a second later unscathed and easily able to make the move to avoid the huge hole that remained below. Phew! I definitely earned my lunch on Tuesday!
But then came Thursday with flows at the 12’ level and the option to run Elevator Shaft on the far right side of Garvin’s. Dammit! If I thought Dragon’s Tongue was intimidating, Elevator Shaft was at an entirely different level. The water plunged 10’ straight down onto the rocks below, which we were assured would not present a problem. That is, as long as we went over it right-side up. Because God only knows what would happen if you decided to have your face cushion your boat’s landing instead of the other way around. And one more thing. There was a reactionary wave just above the actual drop that wants to flip you, but that is not particularly challenging for a solid Class III boater. EJ summed it up appropriately, “Only run this if you are absolutely, 100% positive that you won’t get flipped by the wave.” So there I stood again on the precipice of Garvin’s Chute with that wave of fear descending on me. But I decided to keep a pact with myself that I would throw myself into every challenge that was presented to me during the class as long as it was within my ability. And when I looked at the moves that I needed to make, I had absolutely no doubt that I would be fine. And as fate had it, I went smoothly over the wave, down the drop, and earned my lunch once again. However, the next day one of the students in the Keener program did not stay upright but fortunately managed to make it out of there only banged up and limping. Yikes!
After Garvin’s came the two most poorly named rapids on the river, Upper NoName and Lower NoName. Upper NoName presented a fantastic, clean surf wave while Lower NoName featured big-water rapids with numerous waves and holes scattered throughout. The higher flows on Thursday and Friday changed Lower NoName’s character from a fun, semi-mellow descent to a rockin’, rowdy trip over big waves and around (or through) big holes. On the appropriately dubbed Big-Water-Thursday, attempting to surf a difficult to catch wave at the bottom of Lower NoName was on the menu. The trick to catching this wave was to “surf across Vampire hole” in order to ferry over to the wave. Well, it was technically within my means, so I had to do it, right? After not using Vampire Hole to my advantage the first time and missing the wave, I decided to throw my self smack-dab into the hole and then simply ferry across. Of course, we all know that good stories come from things never being as simple as they seem or as easy as EJ makes them look, which ultimately ends up with some quality carnage. I definitely caught Vampire Hole the next time and got a super rockin’, powerful surf for much longer than I had hoped for! It then spit me out and over into a deceptive little hole that was hiding completely out of sight in the center of the river upstream of the nice surf wave. Vampire has a deservingly mean name, but that nameless hole put more of a beat-down on me than its Transylvanian neighbor. I was window-shaded, or as EJ calls it, “power-flipped” for what seemed like an eternity and which included a shocking, kerthunk of my helmet on the rocks below in this supposedly rockless river. Thankfully, it released me and no swimming was involved. I then proceeded to rest my tired body on the shore for a few minutes before getting back on the horse by hiking back up and running Lower NoName again. When all was said and done, a new hole had been named on the Ottawa- Pat’s Hole.
You would think that was it for play features and beat-downs on the Middle Channel, but you would be wrong. There was minor feature named Warm Apple Pie just around the corner from the take out. So on Big-Water-Thursday, we decided to check it out. As we approached, EJ described it as a “super-retentive hole, but you can always make it out the sides.” Dane and EJ proceeded to throw ends, blast, mystery-move, and generally make it look like good fun. So at his invitation and in keeping with my pact, I decided to hop right in there. It turns out that when EJ describes something as “super-retentive”, it is no joke. I got flipped in the pour-over, rolled up completely disoriented, only to get sucked back in and flipped again in what seemed like an infinite loop. Well eventually, at the first opportunity when I had my wits about me, I heeded EJ’s advice, paddled like hell to the corner of the hole and made it out of there in one piece. Wow! What a day Big-Water-Thursday was for me- skirt implosion in Phil’s Hole and no swimming, then running Elevator Shaft, then getting trashed in Pat’s Hole, and finally getting spanked in Warm Apple Pie! Oh, and did I happen to mention that I did all that in a playboat that I had never paddled before? :-) When people ask me what I came away with from the class, I now say that I went to see the Wizard and I was given Courage!
But wait there’s more! I can’t neglect to mention the Main Channel that we ran on Wednesday at 11.25’. Compared to the number of features on the Middle Channel, the Main was sparser but also that much bigger. With names like Bus Eater, Waikiki, and Coliseum, you can instantly recognize that the Main is not for the faint of heart. Bus Eater is easily one of the most famous surf waves in the world, but it doesn’t “come in” until the flows are great than 14’. Below that level, it is basically a big, mean hole that you don’t want to be anywhere near. It resides at the bottom of Lorne Rapid which consists of a magnificent wave train down river right, so it is theoretically a simple matter to avoid Bus Eater at the bottom. Of course, nothing is ever, ever simple. As we approached the top of the rapid, Dane said to me, “Pat, the top wave is the perfect wave to try a kick-flip. Watch me do one and then you try it.” Rather than fully describe this to you, I will refer you to Wikipedia and suffice it to say that this move was way beyond my ability, not to mention a bit crazy to try considering I had never been down the rapid before with Bus Eater lurking at the bottom. But remember that little pact I made with myself? What the hell! Moments later, I watched Dane launch himself off the crest of the first wave and completely roll his boat as it soared through the air! I approached the wave with as much speed as I could conjure, pulled hard off the lip of the wave, and tried my damnest to corkscrew my boat and myself through the air! All I know for sure is that I launched myself into the Wild Blue Yonder, didn’t pull off the move, and spent a fair bit of time upside down on the subsequent waves. The other thing I know for sure is that I got the courage up to try something that I never, ever thought I would try! The bottom of Lorne Rapid also featured a great surf wave named Waikiki with the most exhaustive eddy-service I have ever experienced. Once again, I put my fears aside and managed to get two decent surfs on this wave that made almost everything in Colorado seem puny by comparison. Wednesday’s lunch? Earned it.
Once again, it seemed like there wouldn’t be anything more to fear on the river, but Coliseum Rapid waited half a mile above the take-out with what seemed like the sole purpose of inspiring awe in us. The entire river converges and simultaneous drops about twenty feet with the result being a string of massive waves that behave erratically with occasionally crashing fronts. And just to spice things up, there is a ten foot high, 150 yard wide pour-over down stream of the waves. Once again, that is a place you don’t ever want to find yourself. A testament to its potential danger is the fact that commercial raft companies employ jet boats to pick up swimmers who weren’t so lucky in Coliseum. The day we were running it, the commercial trips deemed the flow to be too high for them to run it safely. Gulp! For all the build up and potential consequences, Coliseum actually paddled quite easily, save for the fact that I got surfed at the crest of the 3rd wave! Wow, what a river!
Since I have returned from my trek to Mecca, I mean…, the Ottawa, I have been asked on numerous occasions about the most important thing I learned. It is a great question and one that I’ve pondered for several weeks now. After all, I spent 5 days kayaking with EJ, who is undoubtedly the best kayaker in the world, and that time was spent on the Ottawa, which is one of the premier rivers in the world.
First off, although I didn’t learn this for the first time during this week, I was reminded once again how great the people are who kayak. It has been, and remains one of the main reasons I spend so much time on this activity. My comrades in the class were all exceptional on the water and off, and the entire Jackson family was a blast to be around for a week.
As with any difficult pursuit, whether it be golf, skiing, or in this case, kayaking, there is no Golden Ticket that takes you from rank beginner to expert. And so in five days on the water, I wasn’t surprised that my ability level didn’t improve dramatically. But like I said, there were intangibles that I gained that will stick with me, the main one being the courage to try that which is within my ability but that I fear. And what I also learned was not a single skill, but a plan that will allow me to progress and continue to achieve at a higher level. I have summarized the game plan in three steps that are no-duh obvious to most people but that are firmly ingrained in me now.
Fundamentals: EJ describes these as “the rules of the game”. These are the skills that he goes over in great detail in his “Strokes and Concepts” and “Rolling and Bracing” videos. I had been working on these skills throughout the season and the class was very beneficial in terms of correcting bad habits and explaining proper technique. Equally important was the fact that I was able to witness that EJ and Dane focus on these fundamentals all of the time! In order to be great, you need a great foundation!
Repetition: Learning the Fundamentals is not sufficient to become great; you need to repeatedly reinforce those skills through repetition! Once again, I got to see this in action by EJ and Dane all of the time and I have no doubt about how important it is to their success. And, I came to the conclusion that Repetition is something that can be experienced on multiple time scales. The roll can be practiced repeatedly over the course of 5 minute warm up. We are all familiar with this type of repetition, but I think it is equally important that it be practiced over the course of the day on the river and over the course of the entire season. I can’t count how many times I looked over and saw Dane practicing his roll throughout the day. And I have no doubt that he continues to practice it day-in, day-out. That continued level of repetition of the fundamentals at all of those time scales is absolutely necessary for them to become second-nature and there for you at the times when you really need them. Another aspect of repetition that I had never really given thought to or witnessed previously was Dane’s persistence in running the same stretch of river multiple times in a row. Again, I can’t count how many times I looked over and saw him hopping out of his boat, running back up the shore, and hopping in again in order to get another go at the rapid. By Thursday, I had subconsciously caught on to this and found myself running 4 stretches of the river a second time, just because I wanted to. This isn’t only a great approach to getting better, it is also extremely practical. When you consider you much time and effort is expended getting to the river, setting up shuttle, driving home, and all the other little details, the amount of time to run a fun rapid a second time is absolutely minimal! So what if it’s going to take me 10 minutes to walk back up and do it again- I spent 5 hours driving to get here this weekend to do just this!
Staying Positive: Kayaking is an extremely challenging activity. It is part of the reason why it is so fun, but it can also get people into a funk. I am always hearing about “the mental side” of kayaking or rolling, and I have certainly experienced that myself. That mental side is basically when you tell yourself that something might go wrong, or you might not be good enough. In the five days on the river with EJ and countless conversations off the river, I don’t think I ever heard him say something negative! That means that in thousands, if not tens of thousands of situations, he always, always chose to be positive! Wow, what a difference that makes! One of his Fundamentals is to “Always look at/focus on your target.” Always being positive is the ultimate expression of this rule. It not only allows you to achieve your goals and avoid the pitfalls, but it almost guarantees that you are having fun when you make those goals a reality. It is the difference between “making it through” and having a great time.
Like I said, the three steps in this plan are nothing earth-shattering, but I now fully appreciate them and have made them part of how I will be kayaking.
Finally, (wow, you read all the way down to here?!) I managed to pull together some photos and videos that I captured while on the river as well as some from some other sources. I hope you enjoy them!
-Pat
Video compilation, but Youtube removed the soundtrack :-( You can download the video below to your computer for posterity and some great tunes!
49 hours after leaving Boulder, CO, I arrived at the Wilderness Tours resort on the Ottawa River. So far, the plans that I laid out in my New Year’s Resolutions have proceeding beautifully. I love the concept of combining separate goals into an intertwined super-goal so that each portion becomes dependent on the other and is therefore, that much more likely to be accomplished. Tying the EJ kayaking clinic to have a fully working new engine in my van is the example that I am currently fond of. The van performed beautifully with the new Zetec engine as well as the recently added air conditioning and ARB fridge. The very thought of driving close to 2000 miles across the country and into another country during the heat of summer is not something I would have entertained last year. But with the new engine and improvements that I managed to somehow sneak in during the past few weeks among my 50 days of kayaking this year, I was able to make it here in relative expediency and at relatively low cost. And because of the lower cost, attending the clinic was that much more attractive financially than if I had flown and stayed in a cabin all week. Intertwining the goals forced both to happen, rather than allowing either or both to slip away into becoming “almosts”. (I almost spent a week getting better at kayaking with personal instruction from EJ, or I almost fixed up my Westfalia into a road trip worthy vehicle.)
Anyhoo, I’m all set up in my van with the top popped, the chairs swiveled, tables deployed, and tarp hanging off the side in case of rain. And as I feared/wondered, dogs aren’t actually allowed at the resort, so River will be spending a bunch of time inside the van instead of following me around everywhere off leash.
I met with EJ and the other kayakers at 8pm tonight to oriented for the week. The great news is that our class is extremely small- only 4 of us! I know that it is going to be wonderful instruction and that our group is going develop a strong sense of camaraderie and wind up teaching each other almost as much as Eric can. Off to bed for a big week that I’ve been looking forward to for a long time!
I finally kayaked the Numbers section on the Arkansas River after 7 seasons of fearing the class IV run! Here I am celebrating after rapid number 1 went extremely smoothly.
It was a beautiful, warm, sunny day in the Arkansas River valley which was in stark contrast to the cool, rainy months that characterized Colorado kayaking for most of 2009. The river was flowing at 1160 cfs, which was a nice, manageable level for the first time down this classic stretch of water. Our solid group of kayakers chugged through rapids 1 through 6 and all of the intermediate “boogy water” with no issues to speak of. The combination of 42 days of kayaking this year, my commitment to my roll during the late winter months, and the Colorado Whitewater boating class I took late in the spring led to a wonderful first experience and the satisfaction of fulfilling one of my New Year’s Resolutions! It was so much fun that I plan to do it again this weekend!
And how can I not mention the run down the Taylor River that we did on Saturday? I think the Taylor River is my favorite river in Colorado! It is a quintessential mountain river with large boulders strewn throughout and shores that rise steeply into cliffs, pines, and aspen. The water is fun class III+ at the 400 cfs level that we experienced and I think it would be even more fun with some extra water. There is no doubt in my mind that I will be returning to the Taylor in the future!
I attended Colorado Whitewater's annual Training Camp this past weekend and had a great time helping out by sweeping on Saturday and Sunday. We had a really great group of folks and I managed to grab a few photos, so I thought I would post them for the whole crew to see. Hopefully, I will get a chance to get back on the water with some of them again!
Edit 5/21/2009: The G.E. plugin is killing performance on my PC and since it wasn't too impressive, I have removed it from this post.
It is now incredibly easy to embed Google Earth into a blog or website, with the results that you see (maybe) below. However, I'm not sure how effective of a tool this really is. On the one hand, it allows a viewer to explore information without actually having Google Earth installed (although the plugin must be installed in the browser). But on the other hand, the functionality is limited compared to the full version. In particular, I wish that it allowed for a tour to played of waypoints, the way that it can be done in the full version. It also appears that photos within waypoint captions are not being displayed at all :-(
In any case, if you want to embed a KML/KMZ file of your own blog, this tutorial is really easy to follow.


 If you want to know if you enjoy where you live and can really call it home, spend 17 days and 4500 miles driving across the country and back. If, like me, you are utterly relieved and simultaneously overly joyful when you cross your state line again, then chances are that you like where you live and can call it home!
 I specifically chose a different route home so I could see the Gateway Arch in person. A PBS documentary piqued my interest a few years ago, and I told myself that I would make a priority to see it the next time an opportunity presented itself. My evening arrival in St Louis presented the scene with great light, which I used to my advantage as I photographed bunches of perspective shots of this unique American monument that are posted in
  One of the best aspects of


 As we approached the top of the rapid, Dane said to me, “Pat, the top wave is the perfect wave to try a kick-flip. Watch me do one and then you try it.” Rather than fully describe this to you, I will


 And how can I not mention the run down the Taylor River that we did on Saturday? I think the Taylor River is my favorite river in Colorado! It is a quintessential mountain river with large boulders strewn throughout and shores that rise steeply into cliffs, pines, and aspen. The water is fun class III+ at the 400 cfs level that we experienced and I think it would be even more fun with some extra water. There is no doubt in my mind that I will be returning to the Taylor in the future!