
Check back at this post each day to see the progress we've made as we raft and kayak our way down the Middle Fork of the Salmon River!
We launch on Friday, 6/26, take out on Thursday, 7/2, and will then kayak for a few days near Jackson, WY before returning to Colorado.
Update 6/3/09: We are safely off the river after a fantastic week of boating! No more updates to the map from now on.
Monday, June 22, 2009

Thursday, May 21, 2009
Training Camp 2009
 I attended Colorado Whitewater's annual Training Camp this past weekend and had a great time helping out by sweeping on Saturday and Sunday. We had a really great group of folks and I managed to grab a few photos, so I thought I would post them for the whole crew to see. Hopefully, I will get a chance to get back on the water with some of them again!
Photo Album
Wednesday, May 20, 2009
Embedded Google Earth
Edit 5/21/2009: The G.E. plugin is killing performance on my PC and since it wasn't too impressive, I have removed it from this post.
It is now incredibly easy to embed Google Earth into a blog or website, with the results that you see (maybe) below. However, I'm not sure how effective of a tool this really is. On the one hand, it allows a viewer to explore information without actually having Google Earth installed (although the plugin must be installed in the browser). But on the other hand, the functionality is limited compared to the full version. In particular, I wish that it allowed for a tour to played of waypoints, the way that it can be done in the full version. It also appears that photos within waypoint captions are not being displayed at all :-(
In any case, if you want to embed a KML/KMZ file of your own blog, this tutorial is really easy to follow.
It is now incredibly easy to embed Google Earth into a blog or website, with the results that you see (maybe) below. However, I'm not sure how effective of a tool this really is. On the one hand, it allows a viewer to explore information without actually having Google Earth installed (although the plugin must be installed in the browser). But on the other hand, the functionality is limited compared to the full version. In particular, I wish that it allowed for a tour to played of waypoints, the way that it can be done in the full version. It also appears that photos within waypoint captions are not being displayed at all :-(
In any case, if you want to embed a KML/KMZ file of your own blog, this tutorial is really easy to follow.
Monday, April 27, 2009
From Blizzard to Summer Bliss

 The weekend began with yet another April blizzard along the Front Range, but ended with warm, sunny weather in the Utah desert!
I began Friday (4/17/09) by battling awful road conditions through Clear Creek Canyon and up I-70 and was treated to lack of heat in the van during the blizzard as my thermostat decided to flake out on me. (Oh well, another project for next weekend.) But hot or cold, I was lucky to make it through the rough conditions. Laurie, who had the Westwater Canyon permit, got delayed for hours and eventually stuck in Dumont, CO after I-70 was closed. Good thing I made it through there 2 hours earlier! A few hours later, I met up with Kim and Brad in Fruita, where we modified our trip plan slightly. Even though Laurie had most of the food and kitchen gear, we were able to purchase some food and forge on through Ruby-Horsethief canyons on our own. Or perhaps you were able to infer most of this by tracking my progress on the web? :-)
Saturday proved to be much warmer than Friday, with temperatures in the high 50's and sunny skies. The water was moving quickly and thanks to our boat rigging the night before, we arrived at the Black Rocks camp by mid-afternoon just in time for siesta on the beach! I followed my nap up with a hike to the rim above the river and was able to capture the settings below on film.

 Sunday was even warmer and the hot desert sun quickly reminded me of newly acquired sun burn from the day before. We broke camp at a reasonable time and arrived at the Westwater Ranger station by 1pm, where Laurie and the rest of of our group was waiting for us. The rest of the day was a continuation of our mellow float and we camped at Upper Little-D with all the whitewater waiting for us the following day. A great dinner and great company around the campfire topped off the day.
Monday was a rush of rapids in succession that gave way to another warm, sunny float to the Cisco take-out. Best of all- no wind! Of course, I couldn't be satisfied with merely rowing my raft through the whitewater. No, I had to use my new waterproof camera to make a movie of the experience, and Raft-Cam was born!
Sure the camera angle could use a little work, but it is still pretty cool! And if that isn't enough action for you, check out the photo, GPS tracks, and Google Earth files below!
Photo album
GPS Track Log (GPX File)
Google Earth Track with Photos (KMZ File)
Thursday, April 23, 2009
Geotagging Photos using RoboGeo
Geotagging is basically the process of associating location with photographs and can be accomplished in many ways. I have developed a process using a commercial product called RoboGEO that not only geotags the photos, but also creates KMZ files that allow the photos and associated GPS data to be viewed in Google Earth. Here is the procedure I use...
- Start RoboGEO
- Select images to be geotagged by following Step #1 in the left pane. This should probably be the set of images that were considered the "best" images in the Digital Workflow, although you may want to select a subset of them. All of the photos that are to be tagged should have time tags that correspond to GPS track data, or else the application will not know where to place them.
- Select the GPX file that was previously created in Creating a GPX Trip File as the location data for Step #2 in the left pane by selecting From a tracklog file. When you do this, RoboGEO will determine the location of all the photos by comparing their timestamps to those from the GPS tracklog and interpolating as necessary. The Latitude, Longitude, and Altitude will now appear in the Photos pane of the application. You can now save this project by choosing Save Project.
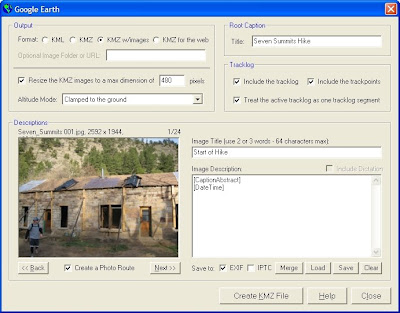
- For Step #3 in the left pane, choose Export to Google Earth with the following settings:
- The Title should be manually set to describe the project you are creating. This will be the top level description in Google Earth.
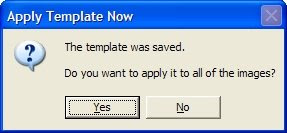
- The Image Description is configured to automatically read the Description from the IPTC header that was added by PixVue and the EXIF timestamp that was added by the digitial camera at the time the photo was taken. Be sure to Save this information using the Save button to a file that I call GeoCaptionTemplate.txt. You will then be prompted to apply the same fields to the Image Description of all the photos which will save you some time, so do it. If you start a new project, you can then just Load the GeoCaptionTemplate.txt and apply it to all the Image Descriptions and you are off and running.
- Manually enter short descriptions for the Image Tile and select Save to EXIF. This field is used to label the waypoints in the navigation pane of G.E., which will otherwise be labeled with the image name. Saving this to the EXIF header will prevent you from having to re-enter this information if the image is used in another RoboGeo project in the future while leaving the IPTC header information intact.
- Select the Create KMZ File button which will automatically build the KMZ file and launch G.E.
- Change the view in 3-D in Google Earth to create a favorable correspondence to each photo (correct heading, elevation, and position), then right-click on the corresponding waypoint in the Places pane, and select Snapshot View. I recommend that Elevation Exaggeration (under Tools->Options->3D View) be set to 1.0 to reduce possible viewing conflicts when other viewers open the file.
- Now when you double-click on that waypoint in the Places pane, it will return you to the viewpoint that you just assigned. You will need to click once more to then display the photo in a pop-up window.
- Add any additional waypoints from the GPX file that were not included automatically by RoboGeo. Open the appropriate GPX file that contains the waypoints, make them visible in the Places pane, and finally, drag them from the Waypoints section under GPS device to the Waypoints section for the KMZ file that is being edited.
- Add any additional information to the top-level heading in the Places pane by right-clicking on it, selecting Properties, and adding text to the Description section. I typically add a short description of the file contents, a copyright notice, and a link to my website.
- Save the KMZ file by right-clicking on the top-level heading in the Places pane, selecting Save Place As, and choosing the same file that you have been working on.
- You are done! Now just make the file available to your friends and family!
Wednesday, April 22, 2009
Digital Workflow
I have strived to present the photos, videos, and GPS data from my adventures on this site in my effort to tell my digital. stories. and along the way I have developed a workflow that I typically use. Yes, it is a lot of time, but it is enjoyable and the end result is a very rewarding personal record that I can share with others.
These processes are not set in stone by any means, and I have not had an opportunity to write about all the steps yet in other blog posts. Therefore, this post will be edited and updated as I learn new methods and alter my techniques. I will also try to update the post date each time, so that it moves to the top of my page.
These processes are not set in stone by any means, and I have not had an opportunity to write about all the steps yet in other blog posts. Therefore, this post will be edited and updated as I learn new methods and alter my techniques. I will also try to update the post date each time, so that it moves to the top of my page.
Before each trip, I attempt to do the following:
- Set the camera date and time of each of my cameras and those of my compatriots to the correct time. I have not yet determined if using local time is best, since it may cause problems when correlating with GPS data.
- Bring extra batteries for each of my cameras and electronics devices.
After each trip for which I have generated substantial photos, videos, stories, and GPS data, I attempt to do the following:
- Import (copy) pictures, videos from digital camera to PC using my conventions for filenames, folder structure. Always give files unique names! Otherwise, applications such as JAlbum will get extremely confused with duplicate file names.
- Use PixVue and/or MS Pro Photo Tools to add common metadata to entire collection of photos. If the camera times were not correctly set prior to photographing, Pro Photo Tools can easily correct the times assuming you know the correct offsets to apply.
- Move all photos into a subdirectory named "All"
- Select best photos and copy into the main directory of Step 1. (Note: This subset of photos can also be used to generate a Blurb book or a playable DVD presentation of the photos.)
- Add additional metadata (descriptions) to photos as appropriate
- Create GPX Trip file.
- Use RoboGeo to geotag photos as appropriate
- Use JAlbum to generate photo album
- Upload the photo album to my server
- Use Windows Movie Maker to create a short movie from the various clips and photos
- Upload the movie to YouTube
- Write blog entry about the subject
- Link to photo album from blog entry and photo index page on website
Why "digital. stories."?
If you have wondered why my blog is titled, "digital. stories. by Patrick Brown", this stream of consciousness may provide some answers.
Digital data may be used as a means of telling stories. Dumping a bunch of photos on the web tells a story about as well as dumping of bunch of random words on a written page. Using new digital media (photos, videos, virtual reality panoramas, time lapse photography, GPS, Google Earth, MotionBased Player, Blurb) to tell stories is an art form just as photography, painting, and music are art forms-- only the tools have changed. It is a chance to explore and create new methods that have never been done before that can immerse a reader/viewer in another world that would never have been possible even a few years ago with all the money in the world.
This blog is used to tell my stories and explains what I have learned about digital story telling. I guess my idea of digital story telling is a little different than most people's, but nonetheless, the idea is to use these technologies as means of conveying a sense of Place and Time and Adventure.
Digital media is just data until it is conveyed in a relevant manner. This is where the art of story telling meets the technology of the digital age. As individuals, today's digital technology is allowing us to generate massive amounts of data that is linked to the memories of our lives, but we are struggling to use this data in a truly useful way. We dump photos on our hard drives with incomprehensible names like img_031567.jpg, or if we are more advanced, we load them to sites like Flickr, Picassa, or worst of all, Snapfish. Photos get dumped into buckets and emails sent to friends and loved ones, but no stories are shared. While it is still wonderful to see these photos, the memories associated with them and the images themselves will soon be forgotten when presented in this manner. There are no stories associated with the images, just pixels. Maybe a few tags or keywords slung here or there, but no systematic labeling or organization of the photos. Photography can be expanded in both space and time to provide an extremely immersive experience in the form of panoramas, virtual reality panoramas, video, and time-lapse video.
And GPS is now providing us with the exact locations we have visited, but rarely ever used to convey the sense of place of our ventures. Combined with the various visual elements from a digital camera and presented in the right viewing environment, a user can now fully explore and see a story unfold before their eyes, on their time, and in the comfort of their favorite chair. This is what I call digital storytelling, and this is how I am striving to share my life adventures with my friends and family.
Digital data may be used as a means of telling stories. Dumping a bunch of photos on the web tells a story about as well as dumping of bunch of random words on a written page. Using new digital media (photos, videos, virtual reality panoramas, time lapse photography, GPS, Google Earth, MotionBased Player, Blurb) to tell stories is an art form just as photography, painting, and music are art forms-- only the tools have changed. It is a chance to explore and create new methods that have never been done before that can immerse a reader/viewer in another world that would never have been possible even a few years ago with all the money in the world.
This blog is used to tell my stories and explains what I have learned about digital story telling. I guess my idea of digital story telling is a little different than most people's, but nonetheless, the idea is to use these technologies as means of conveying a sense of Place and Time and Adventure.
Digital media is just data until it is conveyed in a relevant manner. This is where the art of story telling meets the technology of the digital age. As individuals, today's digital technology is allowing us to generate massive amounts of data that is linked to the memories of our lives, but we are struggling to use this data in a truly useful way. We dump photos on our hard drives with incomprehensible names like img_031567.jpg, or if we are more advanced, we load them to sites like Flickr, Picassa, or worst of all, Snapfish. Photos get dumped into buckets and emails sent to friends and loved ones, but no stories are shared. While it is still wonderful to see these photos, the memories associated with them and the images themselves will soon be forgotten when presented in this manner. There are no stories associated with the images, just pixels. Maybe a few tags or keywords slung here or there, but no systematic labeling or organization of the photos. Photography can be expanded in both space and time to provide an extremely immersive experience in the form of panoramas, virtual reality panoramas, video, and time-lapse video.
And GPS is now providing us with the exact locations we have visited, but rarely ever used to convey the sense of place of our ventures. Combined with the various visual elements from a digital camera and presented in the right viewing environment, a user can now fully explore and see a story unfold before their eyes, on their time, and in the comfort of their favorite chair. This is what I call digital storytelling, and this is how I am striving to share my life adventures with my friends and family.
Creating a GPX Trip File
 Here is a nice procedure I have developed for concatenating several days worth of GPS waypoints and tracks into a single GPX file. The end result is a compact, neat file that hierarchically contains each day's track and waypoints with appropriate descriptions. This file can be easily shared and viewed intuitively in most mapping programs, including Google Earth.
This procedure is written based on the procedure I used to record data to my Garmin eTrex Vista Cx as described in this previous post.
- Extract waypoints from the GPS using Garmin Mapsource. Delete all non-relevant waypoints from list view and save remaining waypoints to ProjectWaypoints.gpx.
- Copy all GPX track files from GPS expansion memory card to PC. (One for each day of the trip.)
- Open up ProjectWaypoints.gpx in firstobject XML editor and save as Project.gpx.
- Open up the first day's GPX track file in another instance of firstobject XML editor.
- Merge or delete separate tracks from the first day to create a single track for the day. Mapsource is useful for identifying and deleting extraneous points. firstobject XML editor or Notepad can be used to manually merge two track segments (XML tag =
). - Copy the track from the first day and paste into Project.gpx at the same level as the waypoints. In order for the Copy/Cut/Paste functions to be available, you will need to double-click the item you are copying or where you are pasting. This will highlight a chunk of the GPX file, and you will then know that you have copied or can paste.
- Repeat the process for each day of tracks.
- Edit the name for each waypoint and track in Project.gpx. (The tree view can show the name of each waypoint in firstobject XML editor if the following lines are added to the Tree Customization box under Tools->Preferences: trk name and wpt name.)
- The GPX file can now be opened in other applications (Google Earth, Mapsource, etc) and will show all the relevant geographical data for the trip while allowing individual tracks for waypoints to be toggled ON or OFF. If viewing in Google Earth, be sure that View->Show Time is set to Never, or G.E. will only show the track for the currently selected time frame.
GPS Data Recording for a Multi-Day Trip
 After some trial and error, I have a nice method of recording GPS data on multi-day trips that is useful both during and after the trip. I typically use this procedure on backpacking, biking, and rafting trips when I will be sequentially moving from one location to another. In these case, I like to know how far I have traveled in total as well as my mileage for the current segment of the trip.
This procedure is based on the Garmin eTrex Vista Cx that contains a microSD expandable memory card. The card can be used to hold topographic and street maps, as I described in this post, and can also be used to store track data. This turns out to be a very useful feature, since the built in capability to save maps is inherently flawed for a few reasons. First off, the available memory for saved tracks is limited to the built in memory, which may not be sufficient for longer excursions. Second, the tracks are saved in a Garmin proprietary format which requires Mapsource to extract them and then convert them to GPX format. Finally, and most importantly, the process of saving tracks results in truncated data. The time of each waypoint within the track gets deleted which makes geotagging photos impossible, and some people have even reported that waypoints get deleted.
Hopefully, I have convinced you that it makes more sense to store your tracks to the microSD card! So let's get started!
- Make sure you have fresh batteries. I replace mine every 2-3 days when used for 6-8 hours per day to make sure I don't have any data drop outs.
- In the GPS go to Main Menu->Tracks->Setup->Data Card Setup and enable the "Log Track To Data Card" option.
- Enable track logging, by choosing the "On" option at Main Menu->Tracks. One of the nice aspects of this procedure is that you do not need to manually save or clear your tracks each day the way you would need to if you were using the built in memory. I should mention that there is an undocumented bug that can ruin your GPS if you clear the track log when it is turned off. I did this and it completely destroyed the software on the unit. Fortunately, Garmin sent me a replacement for free.
- I primarily use the Trip Computer page to monitor my trip progress in real time. As I previously alluded to, each day I make sure to reset the Trip Odometer on the Trip Computer page, but I do not reset the Odometer. This provides real time monitoring of the distance for each day and the entire trip.
- I mark each day's camp and other significant locations with waypoints on the GPS. A very quick method of marking a waypoint is to press and hold the 5 way rocker key. Often times, I just press okay rather than laboriously typing in a description for the waypoint.
- Finally, I carry a small notebook that I jot down the locations I have traveled each day, the names of camps, and descriptions of interesting waypoints. I find that this makes adding descriptions to the GPS data much easier and more accurate when I finally get to looking at it back home.
That's it! And after I have all this data and I've returned home, I go ahead and process it into a single GPX Trip file. But that's a topic for another post!
Thursday, April 16, 2009
Colorado River Follow-Along
I am heading out to raft the Colorado River through Ruby/Horsethief/Westwater canyons at the Colorado/Utah border this weekend, and I found a cool, free website that will allow me to embed a map with my current location into my blog. It is called SPOT Trip Manager, and it seems to be a free service that is hosted by an individual named Jason Jonas who likes to take big motorcycle trips. I love how the web can deliver up almost anything you ask for thanks to resourceful individuals like Jason. It reminds of the "magic box" on Lost that will deliver to you whatever you can imagine! Now if only SPOT will add this capability to their website the way Youtube includes it.
(Update- 4/6/09: The San Juan trip fell through due to attrition, so no updates for it.)
So anyway, here is the map with my most recent locations!
(Update- 4/6/09: The San Juan trip fell through due to attrition, so no updates for it.)
So anyway, here is the map with my most recent locations!
Monday, April 13, 2009
Shoshone and Hanging Lake
 My kayaking season had to begin somewhere with flowing white water, and the class III Shoshone run on the Colorado River seemed like a nice way to ease back into the cold April water. Plus, it seemed fitting that the van's first long voyage away from Loveland Pass should take it Glenwood Springs just like it did last year!
I met up with Vlad on Saturday afternoon, and we did two fun but chilly runs down the one mile stretch of rapids. And I was able to get a few photos and videos with my new waterproof Olympus Tough 8000 camera! I'm looking forward to lots more boating and water photos this year.
 Once again, I camped at the Glenwood Resort campground within 20 feet of the river. The exhaustion of kayaking the cold river in 45 degree temperatures coupled with a late Friday night out seeing the Wailers must have really caught up to me, because I slept 13 restful hours Saturday night! After some coffee and quiet reading Easter morning, I headed up the highway a few miles to the Hanging Lake rest stop.
  I have intended to hike up to Hanging Lake on many occassions, yet it never happened until Sunday. It's a moderate, 1+ mile hike from the rest area, and the trail was covered by snow for about half the distance. It is definitely worth it though. The lake is perched on the side of cliffed wall with water pouring over lips into the aquamarine pool. If you have 2-3 hours, be sure to check it out for yourself!
Saturday, April 4, 2009
Did you hit it with a hammer?
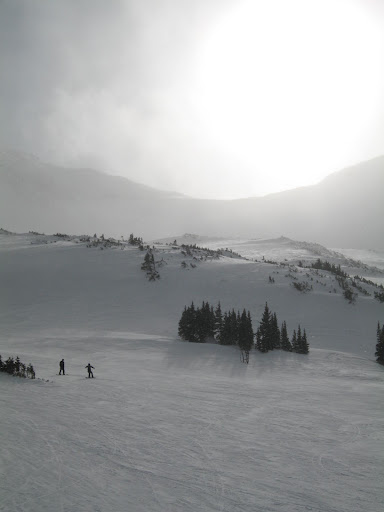 When the day was over, I had been asked this by at least four separate individuals. And to think that I had never heard of this trick before this week. Unfortunately it didn't help, and I needed a bigger metaphorical hammer to get my van moving in the snow again.
The spring snow storms have been continuing here in Colorado, so I decided to venture up to Loveland Ski area and sleep in the Westfalia last night. The anticipation and excitation built within me during the last hours of work on Friday, since at least a foot of snow was predicted to fall overnight with similar amounts throughout Saturday. My plan was beautiful. I would drive my souped up van to the ski area, sleep blissfully in propane fired warmth, and awake to a foot of snow and first chair while all the other suckers in Colorado battled the elements and each other on I-70 to make it up to the mountains.
The plan began great too. I made it up to Loveland quickly with favorable road conditions, but then I faced the issue of where to park the van over night. If I parked in the middle of the lot, I risked getting asked to move by plow trucks. If I parked at the exit on the side pull-off, I risked getting plowed in and having to listen to 18 wheelers drive within 15 feet of my bed all night. So I opted to park next to the snow cat operators trucks at the edge of the Loveland parking lot near the maintenance building. I would blend in with them and wake up early to gobs of snow and the best skiing of my life- a tremendous plan. I spent the evening chatting on the phone, watching a movie on my laptop, and drinking hot chocolate with Bailey's. I have to say that it was all quite civilized up to that point when I turned in at midnight to catch some Z's.
I discovered that there are some serious issues with camping in your van in a ski area parking lot and that they are compounded when it is snowing out and you are parked next to the maintenance shed. First off, the snow cats like to go out and groom for a while and then return to the shed for a while. And when they do, their engines idle loudly and their ultra bright lights illuminate the entire area. And for some reason, they go out on missions for a while and then return, and they do this several times over the course of the night. Of course, I was paranoid that they would discover the imposter in their parking lot and they would kick me out. I don't like snow cats quite as much any more. Second, guys who operate plows must really love their jobs, because they don't just plow a row once. They do it over and over and over again. And they don't seem to mind plowing snow right up to parked cars. Maybe the pull off parking spot wouldn't have been so bad after all. Finally, Loveland and CDOT like to blast for avalanches early in the morning. There's nothing quite like explosive charges to get your day going.
With all the racket and my paranoia, I probably got about 3 hours of sleep between midnight and my alarm at 7am. To top things off, the propane ran out some time during my slumber, so I awoke to freezing conditions inside the van and the inability to make coffee and toast in the van. Suddenly, things weren't quite so civilized any more. No problem, I thought. I will start the van to warm things up, get my ski clothes on, grab breakfast in the lodge, and blast through feet of fresh powder. Not so fast sonny. The forecast was a little optimistic in terms of snow accumulations. I would say that there was 6-8" of fresh snow, which was still good, but not the blizzard I had hoped for. Alright, turn the key to start your wonderful new Zetec engine- rrrrr, rrrrr, rrrrr. Ah crap, did I mention that the only piece of the van that I didn't replace during the engine conversion was the starter and that it started having "issues" with the solenoid not engaging the gear teeth last week? When I talked to Brady at Bostig on Wednesday, guess what he asked me? "Did you hit it with a hammer?" So on Tuesday, I crawled under the van, tapped the starter with a hammer, played with the gear shifter position, and got it started. It started without issue the rest of the week, so I thought I was in the clear. Apparently not.
SUVs, trucks, and Suburus began to pour into the parking lot and now I had to figure out how to start my van- crap, definitely not civilized. All of these Front-Range-get-up-in-the-dark-to-drive-I70-suckers were going to beat me to the fresh snow and I was going to be stuck working on my van one more weekend. At that point, I began to get a tad frustrated. Lack of sleep, hunger, cold, and a failed plan do not make a happy Pat. I donned my cold ski clothes, climbed under the van in the snow, and did my best to hit the starter with a hammer. Rrrrr, rrrrr, rrrrr- still no dice. Screw it, AAA will bail me out later in the day if worse comes to worst, I'm going skiing. So I spent the morning telemarking through some fantastic powder conditions. The snow wasn't particularly deep, but it was a great consistency, the mountain wasn't too crowded, and I skied really well. Loveland is a really cool place to be on a powder day, but that day can only last so long before exhaustion sets in and it's time to head home.
I wandered back to the van determined to get it started by hitting it with a hammer. I struggled from every position imaginable, but it just wasn't happening, so I did what every normal guy does when he gets stuck (actually, no I didn't drink a beer), I stood there and and just stared at it. Along comes a dude who says, "You got a Suby engine in there?" Sweet, this guy know these vans and will be able to help me some how. I tell him about the Zetec and my crappy starter, and guess what he says? That's right, "Did you hit it with a hammer?" and then he wandered off to better times on the mountain side. At that point, I knew there were only two options- some how get the van out of the parking space and moving, then pop the clutch to get it started and drive back to Boulder without shutting off the engine, or I could be a loser and have AAA tow me home. Time to find some one with a truck to yank me out of the parking space.
 All of a sudden, being parked next to the maintenance shed wasn't such a bad thing. A bunch of guys were hanging out by the door, so I explained my situation to them and quickly had a few guys with a two-wheel drive dump truck trying to pull me out of the parking space. I quickly discovered that there is an inherent problem trying to pull a vehicle out of a ski area parking space. You see, these guys park as many cars a possible into the lot so the ski area can make as much money as possible. That means that there are narrow rows between the tightly packed cars and that my stuck van had to be pulled by a tow strap out into the row at an awkward angle without hitting the cars parked next to me. We tried several combinations of different trucks, different angles, and different drivers before ultimately finding success and unbeknownst to each other, every one of the drivers asked me "Did you hit it with a hammer?" regarding the starter! We finally extracted the van without damaging any other vehicles and got it moving down a hill where I popped the clutch and started the van!
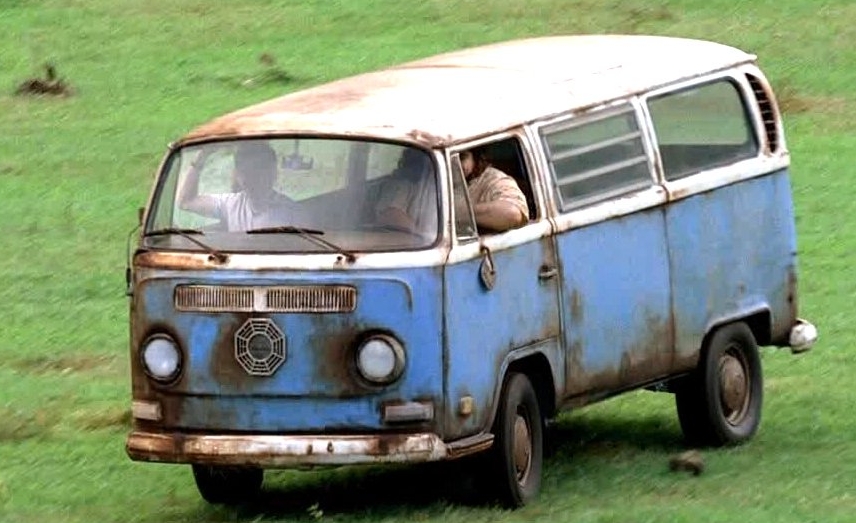
  I felt strangely like Hurley on Lost and Greg Kinnear in Little Miss Sunshine. Apparently jump starting a VW bus is a right of passage for owning one of these vehicles, and I can now check that off of the list of odd things I have done in my life. I left the engine idling, hopped out and thanked the dump truck dude profusely with handshakes and my remaining Alaskan Ambers. An hour later, I was back in Boulder zonked out on my couch with a roaring fire. That's what I call civilized.
Sunday, March 29, 2009
March Blizzard 2009
 The Colorado Front Range had only received 2 inches of precipitation in the past 5 months and it had been balmy throughout the new year, so we all knew we were bound to get smacked with a spring blizzard. The snow came Thursday (3/26) morning and dumped a foot and a half in Boulder. CU was shut down and the governor declared a state of emergency to pull stranden folks off of US-36. To me, it was a nice opportunity to take some photos of surreal shapes in my front yard and to get out cross country skiing with Mike. Enjoy the photos!
Sunday, March 15, 2009
Zetec Final Exam
Today marks the second week I have had my Zetec up in running in my
1985 Westfalia! I had already put 300 miles on it, so yesterday I gave
it a thorough check out and everything looked great.
This morning, I drove it up I-70 in Colorado to go skiing, which was
the final exam of this whole process for me and the Zetec. The main
reason I put the Zetec engine in was that I wanted to be able to take
the van all over Colorado up and down steep, high altitude passes on a
regular basis at normal highway speeds and without worrying about
breaking down. There are 2 or 3 hills on I-70 that are absolute
killers, and I got to test out the Zetec on one of them just west of
Georgetown.
I also created a playlist on Youtube with the 5 documentary videos I made in
the correct order:
http://www.youtube.com/view_play_list?p=D43034D72686EB02
In case you missed the 3rd video in the series that included the first start of the Zetec in the Vanagon, here it is:
And since I'm a big geek, I recorded my trip with a GPS, so you can check out the route, speed,
and altitude at:
http://trail.motionbased.com/trail/player/7806254
Enjoy!
Pat
1985 Westfalia! I had already put 300 miles on it, so yesterday I gave
it a thorough check out and everything looked great.
This morning, I drove it up I-70 in Colorado to go skiing, which was
the final exam of this whole process for me and the Zetec. The main
reason I put the Zetec engine in was that I wanted to be able to take
the van all over Colorado up and down steep, high altitude passes on a
regular basis at normal highway speeds and without worrying about
breaking down. There are 2 or 3 hills on I-70 that are absolute
killers, and I got to test out the Zetec on one of them just west of
Georgetown.
I also created a playlist on Youtube with the 5 documentary videos I made in
the correct order:
http://www.youtube.com/view_play_list?p=D43034D72686EB02
In case you missed the 3rd video in the series that included the first start of the Zetec in the Vanagon, here it is:
And since I'm a big geek, I recorded my trip with a GPS, so you can check out the route, speed,
and altitude at:
http://trail.motionbased.com/trail/player/7806254
Enjoy!
Pat
Bostig Engine Conversion Write-Up
Sunday, March 1, 2009
Cruising in the Zetec-powered Vanagon!
I can't believe how incredible the Zetec is in my Vanagon! Joe came down and provided a tremendous amount of help to me this weekend, and we got the van running beautifully today, 8 days after I tore out the old VW waterboxer engine!
I will let video speak for itself (PG13 for language)!
I will let video speak for itself (PG13 for language)!
Bostig Engine Conversion Write-Up
Sunday, February 22, 2009
Zetec mounted in the van!
 It was another long day and a great conclusion to the weekend to be able to see the Zetec mounted in the van!
 There was a lot of incidental work like figuring out how to take apart (put back together) CV axles, mounting brackets in the engine bay, transferring equipment to the new transmission, and finally mating the transmission to the engine. Fortunately, Joe came over and helped me, and since he has already been through the process, it was much, much easier. Finally at about 7pm , we got the engine and transmission up and bolted into the van without support from the engine hoist. There is still a lot to do before turning the ignition key, but I'm starting to see the light at the end of the tunnel!
Check out another video diary from today's efforts.
Bostig Engine Conversion Write-Up
Saturday, February 21, 2009
Vanagon engine removed
 It was a long day, but when all was said and done, my VW camper van was without an engine and I was happy about that!
 I had to remove the old WBX engine in order make room for the new Zetec (not at all unlike John Locke having to die to save the "Island" on Lost), and today was the day to get the work done. Thanks to the wonder of craigslist, I found another VW fanatic named Todd who helped me remove the engine. It was a huge help to have him there, since he had previously removed several engines from Vanagons; not to mention that two sets of hands really makes a difference when doing that kind of work.
 It was a full-day affair, and since many people have wondered exactly how long it takes to remove an engine and install a Zetec as part of the Bostig conversion, I decided to make a video diary for the day. I'm hoping to make one for the installation process also, but 'till then, check out what I did today...
 Bostig Engine Conversion Write-Up
Saturday, February 7, 2009
Zetec Progress
 I am moving forward quickly with preparations on my Zetec engine prior to the transplant into the Vanagon. I have completed the SK-A (adapter) and SK-C (cooling) steps of the conversion process which means that I am a few steps away from being ready to pull the old engine out and put the new one in. On Monday, I should receive the SK-E (exhaust) and SK-M (mounting) kits and the GoWesty rebuilt transmission. These parts should provide everything I need to complete dressing the engine prior to my goal of transplanting on the weekend of February 20. It's going really smoothly so far, so I'm going to keep my fingers crossed!
Bostig Engine Conversion Write-Up
Training video
Last night, I made a training video for work that spoofed the training films from the t.v. show Lost. If you have seen the orientation video for the Swan station, you might find this funny. It really helps to also know that what we are doing with our tests at work is very similar to what they are telling people to do in the Swan film. For the back-story on the Swan training video, check out Lostpedia!
Sunday, February 1, 2009
One month down...
It's hard to believe that the first month of 2009 has come and gone! I didn't manage to write during January, since I was busy working on my resolutions and goals for the new year.
Piano
 The only resolution I have made any measurable progress towards is learning to play the piano. I have been taking lessons for 4 weeks now and practicing on my Yamaha YPG-625 digital piano. I have to say that this is one of the most challenging/difficult endeavors I have ever embarked on. There are two feelings that I usually experience while learning and practicing the piano. When I am learning a new concept, my brain hurts beyond normal description and the only way I can attempt to relate the feeling is to say that it feels like I've stuffed a grand piano into my head (like in the cartoons)! And when I practice playing a song from beginning to end, I find myself holding my breath and concentrating with such devotion that you'd think I was trying to levitate. Sounds like fun, huh? Actually, I know that with time I will progress and it will begin to feel more natural. Till then...
Robotics
Without a doubt, my biggest time sink during January has been mentoring the Fairview High School robotics club as we build a robot in 6 weeks to compete in the FIRST robotics competition. I have found myself spending 20 hours a week after work and on weekends working on this project. In some ways we are making tremendous progress and in others, we are spinning our wheels. Although spinning our wheels literally won't be one of them, since we have implemented traction control in our software system! I have to say that volunteering has also been a major challenge for me that has resulted in more than a headache or two. However, I really believe that when this is all finished, the students, the other mentors, and I will come away having learned about ourselves and working as a team at least as much as we learned about building a robot.
Engine Transplant
 Finally, I have just begun to work in earnest on the Zetec engine conversion for my Westfalia van. Yes, this is usually a full time project without spending 20 hours a week building robots, having a grand piano stuck in your head while levitating, and playing men's basketball (7 points last week, yeah baby!), but I am really excited about this project and hope to complete it by March. It is an ambitious goal, but I'm off to a great start! I received the donor engine for the transplant a few days ago and performed a Cinderella transformation on it from ugly, dusty, junkyard engine to shiny, 7345 mileage, reliable beauty! In order to keep myself on track, I'm using Google Notebook to track my progress and have shared the notebook with the world. Take a look if you are interested in such things.

Piano
 The only resolution I have made any measurable progress towards is learning to play the piano. I have been taking lessons for 4 weeks now and practicing on my Yamaha YPG-625 digital piano. I have to say that this is one of the most challenging/difficult endeavors I have ever embarked on. There are two feelings that I usually experience while learning and practicing the piano. When I am learning a new concept, my brain hurts beyond normal description and the only way I can attempt to relate the feeling is to say that it feels like I've stuffed a grand piano into my head (like in the cartoons)! And when I practice playing a song from beginning to end, I find myself holding my breath and concentrating with such devotion that you'd think I was trying to levitate. Sounds like fun, huh? Actually, I know that with time I will progress and it will begin to feel more natural. Till then...
Robotics
Without a doubt, my biggest time sink during January has been mentoring the Fairview High School robotics club as we build a robot in 6 weeks to compete in the FIRST robotics competition. I have found myself spending 20 hours a week after work and on weekends working on this project. In some ways we are making tremendous progress and in others, we are spinning our wheels. Although spinning our wheels literally won't be one of them, since we have implemented traction control in our software system! I have to say that volunteering has also been a major challenge for me that has resulted in more than a headache or two. However, I really believe that when this is all finished, the students, the other mentors, and I will come away having learned about ourselves and working as a team at least as much as we learned about building a robot.
Engine Transplant
 Finally, I have just begun to work in earnest on the Zetec engine conversion for my Westfalia van. Yes, this is usually a full time project without spending 20 hours a week building robots, having a grand piano stuck in your head while levitating, and playing men's basketball (7 points last week, yeah baby!), but I am really excited about this project and hope to complete it by March. It is an ambitious goal, but I'm off to a great start! I received the donor engine for the transplant a few days ago and performed a Cinderella transformation on it from ugly, dusty, junkyard engine to shiny, 7345 mileage, reliable beauty! In order to keep myself on track, I'm using Google Notebook to track my progress and have shared the notebook with the world. Take a look if you are interested in such things.
Subscribe to:
Posts (Atom)